May 2017
John Vincent Bellezza
Welcome to Flight of the Khyung as we resume exploration of uppermost Tibet and beyond! Join us for another intellectual trek across lands less traveled. This month’s issue contains a fine selection of landmarks. We begin with an article on newly discovered rock art in eastern Ladakh by writer and explorer Viraf Mehta. A continuation of the article on wild yak rock art that began last month is also found among these pages. A remarkable array of these great beasts are on view. The third and final feature in this newsletter reviews a recent genetic study and its implications for the cultural development of western Tibet over the last three millennia.
The Hidden Rock Art of Ladakh
Text and photographs by Viraf Mehta
The May 2016 Issue of Flight of the Khyung carried an article by the present author on the rock art of the northern-most region of Ladakh, namely the Nubra Valley. It focused on previously unreported petroglyphs from and in proximity to the ancient Saser La route to Yarkand and Central Asia.
This article focuses on the Changthang region of Ladakh, the vast high altitude (over 4000 m) plateau of south and southeast Ladakh bordering on Western Tibet (China), traditionally peopled by nomads or the Changpa and their famed pashmina goats. The region is best known to tourists for its spectacular lakes, especially Pangong Tso (straddles the contested India-China boundary), hot-springs (especially Chumathang, Puga), splendid monasteries (Hanle, Shachukul, Tangtse, Chushul, Korzok, to mention a few), rare and seasonal fauna and flora, and some of the most spectacular Transhimalayan scenery in Ladakh.
Rock art, almost exclusively in the form of petroglyphs, is widely distributed in the Changthang region, but these have only received the attention of local and foreign researchers over the past two decades, not least due the closed or restricted nature of areas near the border with China (Tibet). With the recent opening of routes, significantly the road up to Nyoma (175 km up the Indus River from Leh), several ‘new’ rock art sites have been noted and await formal academic study and publication. A significant number of these sites display images and motifs with characteristics of the Western Tibet Plateau Style (after Bruneau and Bellezza 2013); for instance, in the depiction of Yaks.
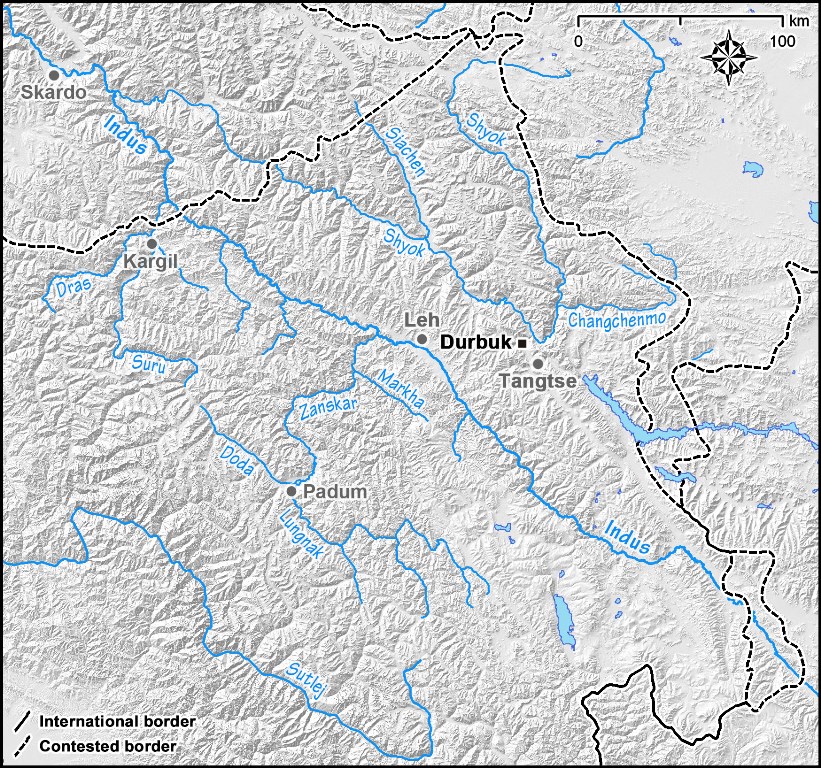
Fig. 1. Location of Durbuk in Ladakh. Drawn by Quentin Devers.
The present article takes us along the well-travelled ancient trade and modern tourist route across the Ladakh Range via the Chang La (5325 m) and descending to Durbuk and, 10 km further southeast, to Tangtse. Situated at an altitude of about 4000 m, Tangtse (Drangtse) is a gateway to Pangong Tso for present-day tourists and to Chushul and the heavily guarded border with China. In past times, Tangtse was the last major staging-post for the long and tortuous journeys by traders, missionaries and pilgrims to distant destinations extending to Yarkand and Khotan in the north and Lhasa in the south. Tangtse, in reflection of its geographical location, is also home to significant rock art spanning prehistoric, historic and modern times. Tangtse has been known to researchers for over a century and has attracted the attention of several international scholars in recent decades. Of particular interest are about a half-dozen very large boulders with a wide variety of petroglyphs and inscriptions in Arabic, Sogdian, Thokarian, Sarada and Tibetan that date back to the late first millennium A.D. (Rohit Vohra 1983, etc). Additionally, Tangtse is a repository of several splendid images of animals and hunting scenes, a dominant theme of the petroglyph landscape of Ladakh, as well as depictions of chortens, symbols and even a few rare pictographs.
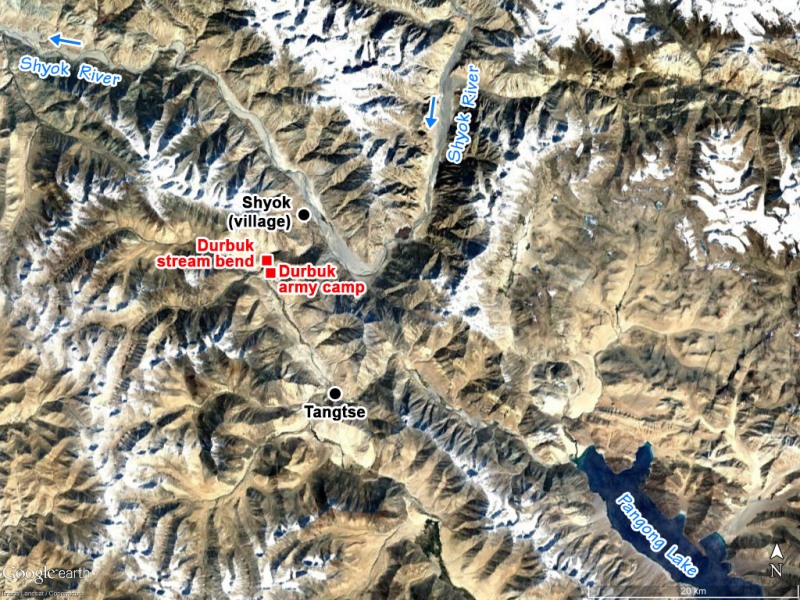
Fig. 2. Location of the two petroglyph sites of Durbuk. Image modified by Quentin Devers.
Against this backdrop, I was eager to explore the possibility of rock art occurring on routes north of Tangtse, and particularly the route from Durbuk to Shayok (see fig. 2). This seemed a reasonable expectation, given the well-known significance of the winter route to the Karakoram Pass along the Upper Shayok river. The route from the village of Durbuk (3800 m) to Shayok (3680 m) runs along the Chumchar stream for approximately 14 km. In May 2010, I came across petroglyphs on a plain a few kilometers before Shayok village. Within the curvatures of heavily eroded temporary rock-shelters were images of yaks, wild sheep and other indistinct animals. Interestingly, one such boulder bore an image of a maned horse and another with a rider, attesting perhaps to the probable camping ground function of the location. In July 2014, I halted at Durbuk village to pay a courtesy call to Togdan Rimpoche, who very kindly gave me a most valuable briefing on the holy site of Tarsing Karmo, situated about 25 km up the Shayok river, and host to a revered local oracle. Proceeding along the road from Durbuk to Shayok, one encounters an army camp (Durbuk Site 1) which stretches for several hundred meters above the road. This area is strewn with large and medium-sized boulder upon which petroglyphs occur. Beyond the army camp, the road follows the stream (on one’s right) and where it takes a bend is a large collection of big boulders and rock shelters upon which petroglyphs are found (Durbuk Site 2).
Durbuk Site 1 (army camp)
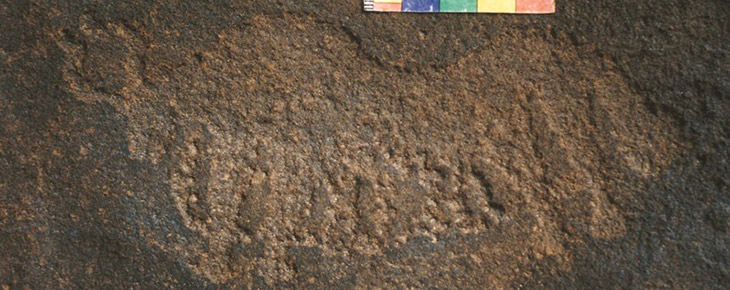
Durbuk Site 1 is distinguished by rocky outcrops and large boulders with weathered pale to dark brown patina. Given its proximity to water, one can reasonably visualize it as a camping ground en route to the Shayok valley. As we shall see from the selection of pictures that follow, Durbuk Site 1 displays a diversity of themes, motifs and styles as well as some unique compositions.
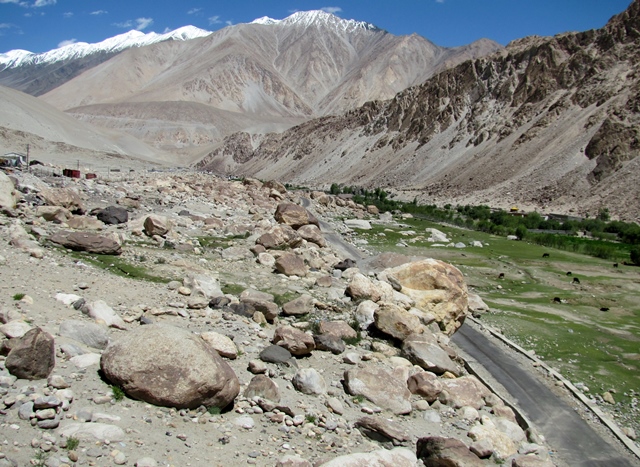
Fig. 3. View of Durbuk Site 1 (army camp).
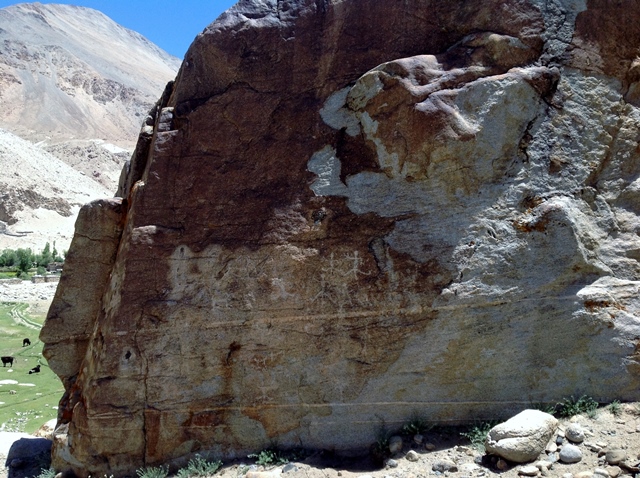
Fig. 4. Views of a weathered boulder face on which several animals are depicted (including wild sheep and ibex and other indeterminate ones) alongside simple line carvings of distinctly male anthropomorphs in a leaping posture, as if in celebration.
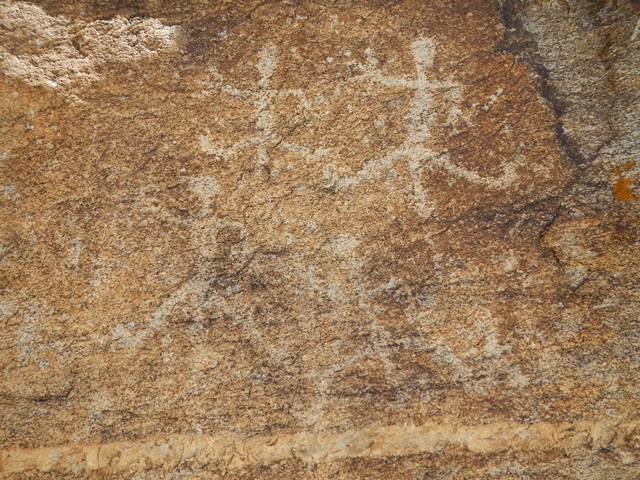
Fig. 5. Close-up view of the male anthropmorphs in fig. 4.
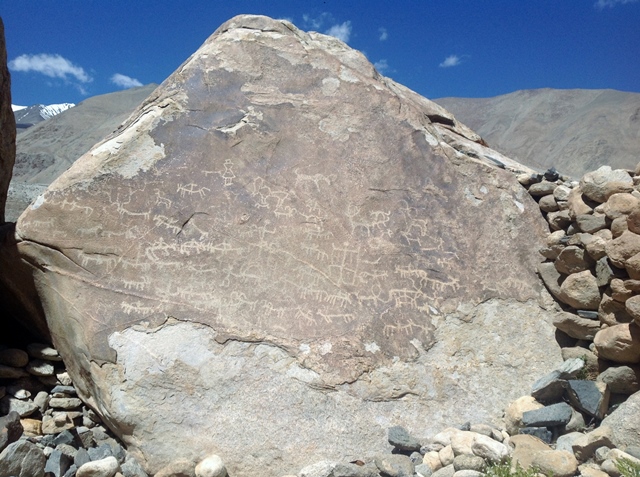
Fig. 6. A large boulder with weathered surface displaying a wide variety of animals including sheep, stag, deer and yak. These animals are accompanied by horsemen and other simply drawn humans. There is also a bi-triangular anthropomorph. The animals seem to have been composed in styles of varying complexity, from simple geometric lines to fully pecked body outlines.
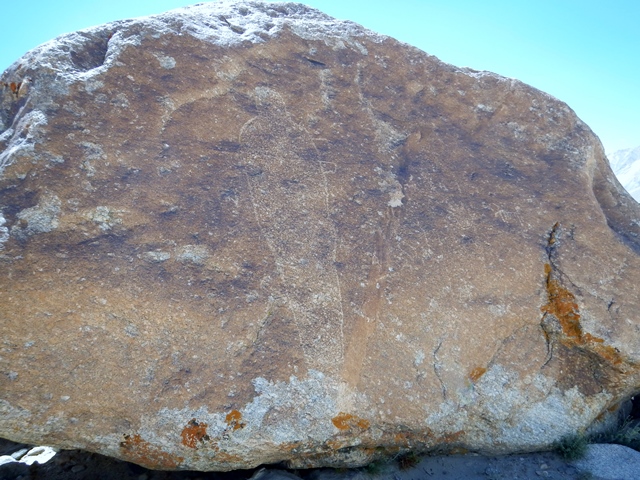
Fig. 7. A unique petroglyph of a life-size human outline. Whilst there are examples from Ladakh of a similar outlined human form (e.g., Baima, along the lower Indus), they are displayed horizontally. In the present case, the figure has been filled using a pecking technique and possesses appendages a little below the left shoulder. The right side of the picture displays the contours of what could be the arms and hands of a second figure, along with a few scattered deer.
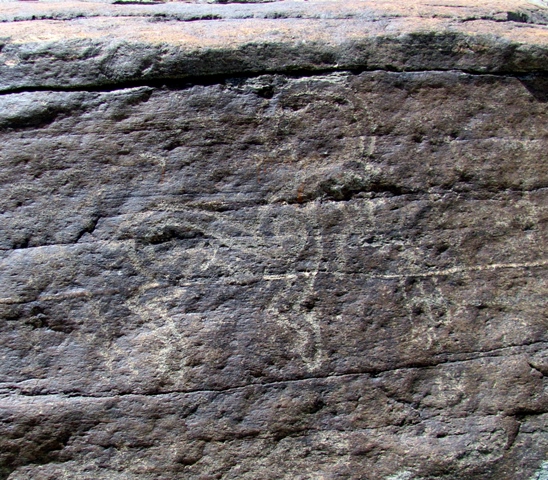
Fig. 8. Given the relatively simple drawing styles employed at Site 1, we find a surprising rendition of a deer composed in the elegant formula of the Central Asian animal style, with central S-shaped motif and on the tip of its hooves (more clearly visible in the hind ones).
Durbuk Site 2 (stream bend)
The site is represented by a collection of large weathered boulders along the left bank of the Chumchar stream, several of which have petroglyphs. As we shall see from the selection of pictures, the motifs include depictions of animals (yak, sheep, horse) hunting scenes, geometric shapes and symbols, and even a chorten. It seems that people used these large boulders for temporary shelter or as a campsite.
Both sites have been damaged by the metalled road that runs from Durbuk to Shayok, but it is difficult to estimate the extent of the damage without accurate information about earlier conditions.

Fig. 9. General view of Durbuk Site 2 (stream bend).

Fig. 10. Weathered boulder with animals and geometric shapes and symbols.
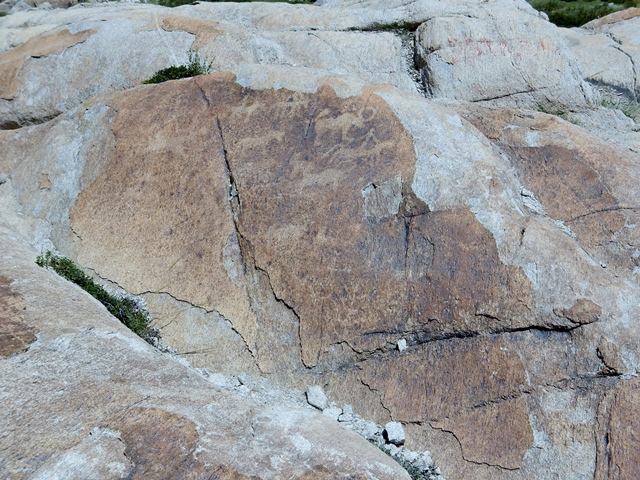
Fig. 11. Horsemen, yaks and other animals.
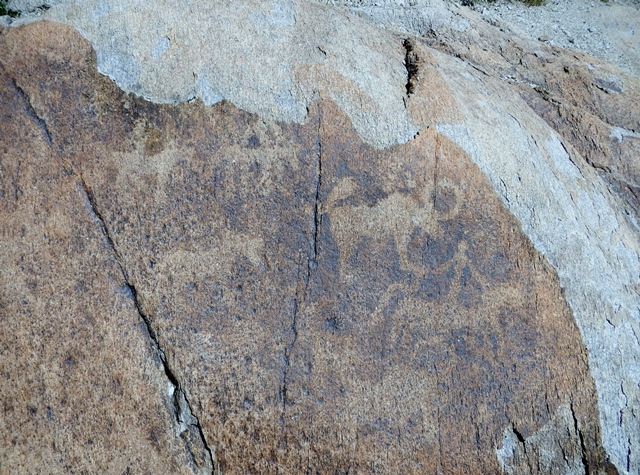
Fig. 12. Close-up view of the animal and horsemen engravings.

Fig. 13. Weathered boulder with yak, deer (?) and solitary chorten.
Concluding remarks
Whilst the two sites described require further documentation, they demonstrate that rock art also exists in proximity to the well-known and described historic period site at Tangtse, along routes well-used in ancient times. Furthermore, the Durbuk army camp site boasts a rich array of unusual rock art in a ‘sanctuary’ setting, significant in its own right, as it points to linkages with rock art beyond the indigenous expressions of the nomadic people of Changthang.
As is the case with so many sites in Ladakh, those mentioned in this article are in urgent need of protection and conservation.
Cutting Horns and Thundering Hooves: Wild yak portrayals in the rock art of Upper Tibet – Part 2
Note: For the introductory essay of this article see last month’s (April 2017) newsletter.
Gallery of wild yak rock art images
Group 5: Wild yaks with wedge-shaped tail raised upward
This group is characterized by wedge-shaped tails that point straight upward or are inclined but still positioned above the back. It is otherwise a highly diverse assemblage exhibiting a wide range of motifs, styles, techniques of production, and is distributed across Upper Tibet. Most examples in this group are assigned to the Iron Age.
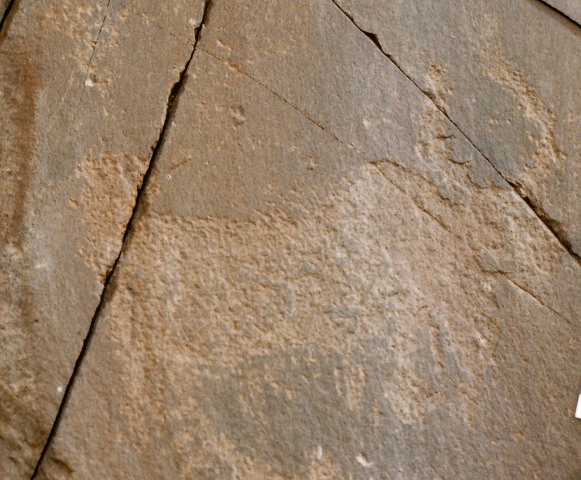
Fig. 81. Lone wild yak
Prominent motifs: wedge-shaped tail; inward curving horns; anterior hump; rounded snout; flat belly; four unflexed legs
Body: silhouetted
Technique: deeply engraved
Region: Western Changthang
Estimated Age: Iron Age
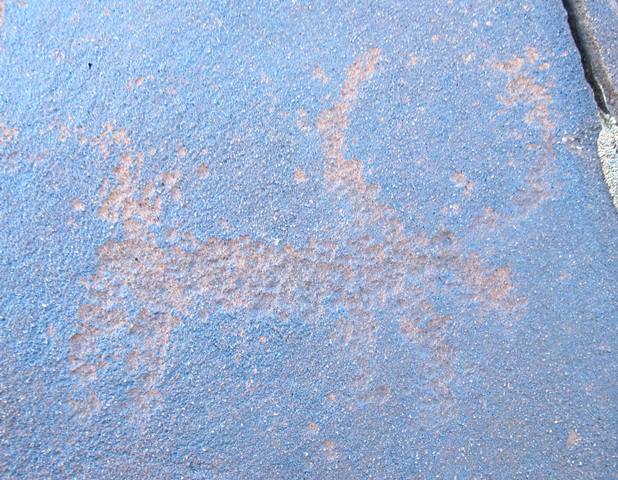
Fig. 82. Lone wild yak
Prominent motifs: wedge-shaped tail; long, inward curving horns; no anterior hump; rounded snout; flat belly; four unflexed legs
Body: silhouetted
Technique: moderately engraved
Region: Far Western Tibet
Estimated Age: Iron Age
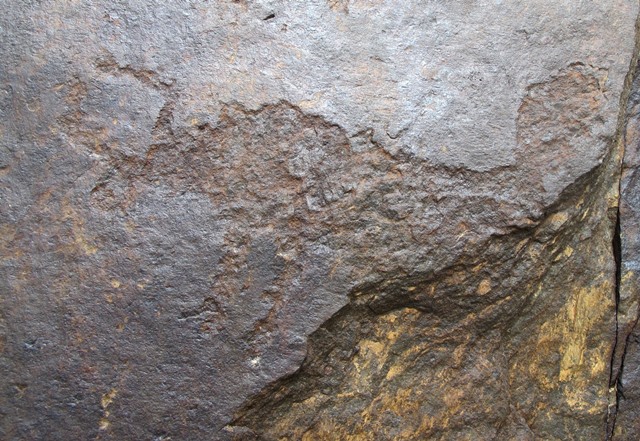
Fig. 83. Lone wild yak, bottom rear of carving missing
Prominent motifs: wedge-shaped tail; inward curving horns with right angle; anterior hump; square snout; rounded belly; unflexed legs
Body: silhouetted
Technique: deeply engraved
Region: Far Western Tibet
Estimated Age: Iron Age
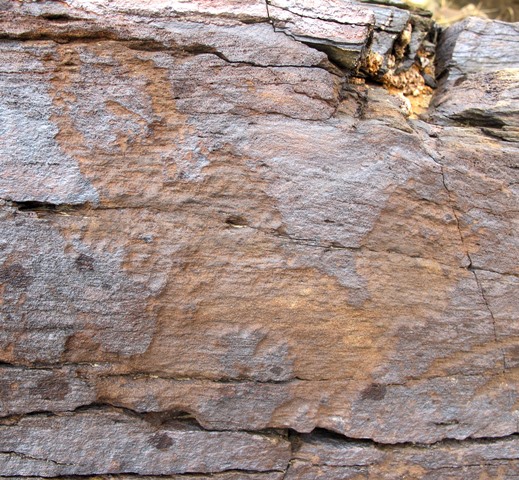
Fig. 84. Lone wild yak
Prominent motifs: large wedge-shaped tail; inward curving horns; anterior hump; blunt snout; arched belly; two very thick, unflexed legs with long front foot
Body: silhouetted
Technique: deeply engraved
Region: Far Western Tibet
Estimated Age: Iron Age
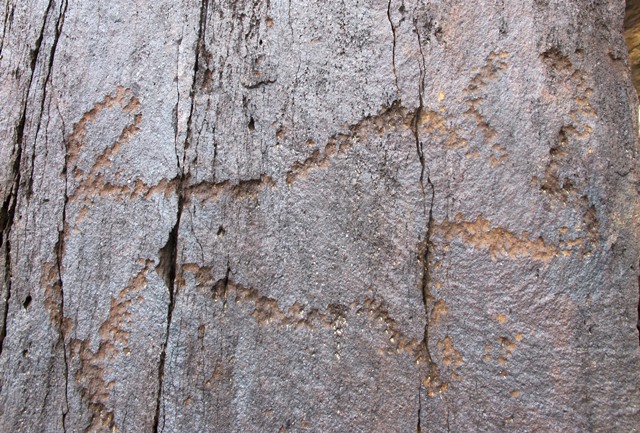
Fig. 85. Lone wild yak
Prominent motifs: wedge-shaped tail; inward curving horns, top of head open; anterior hump; rounded snout; rounded belly; two V-shaped legs
Body: outlined
Technique: moderately engraved
Region: Far Western Tibet
Estimated Age: Iron Age
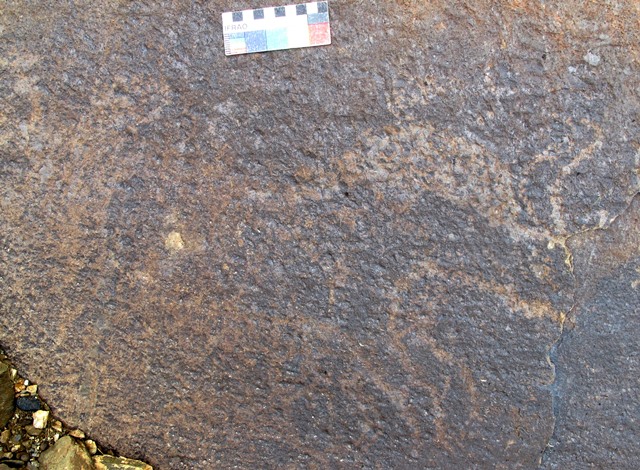
Fig. 86. Lone wild yak
Prominent motifs: wedge-shaped tail; forked horns with curve; anterior hump; blunt snout; flat belly; flexed legs
Body: partially silhouetted
Technique: moderately engraved
Region: Far Western Tibet
Estimated Age: Late Bronze Age
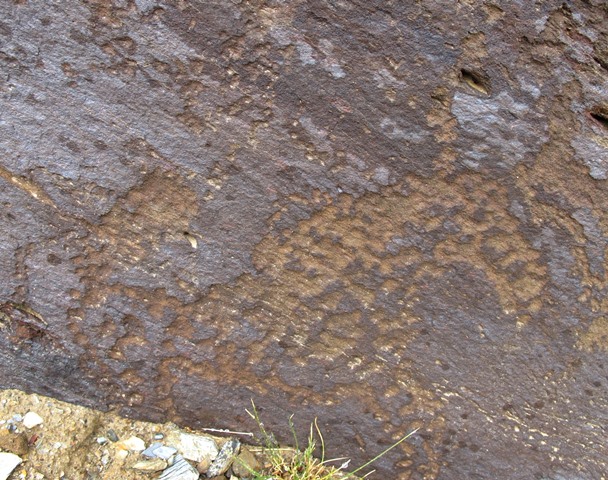
Fig. 87. Lone wild yak
Prominent motifs: wedge-shaped tail; inward curving horns; anterior hump; elongated snout; rounded belly; two thick, flexed legs
Body: partially silhouetted
Technique: moderately engraved
Region: Far Western Tibet
Estimated Age: Late Bronze Age or Iron Age
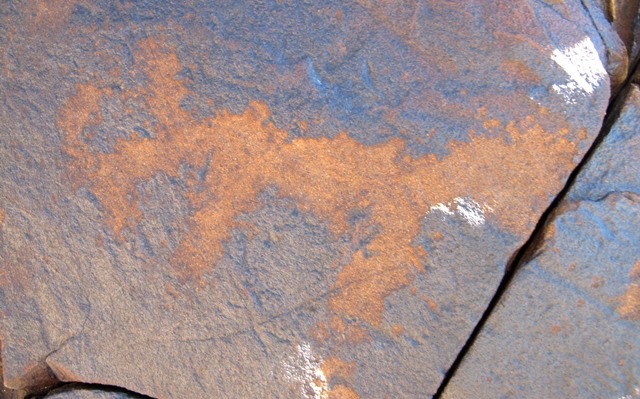
Fig. 88. Lone wild yak
Prominent motifs: wedge-shaped tail; thick, inward curving horn, straight horn; small anterior hump; triangular snout; rounded belly; two thick, unflexed legs
Body: silhouetted
Technique: moderately engraved
Region: Western Changthang
Estimated Age: Iron Age
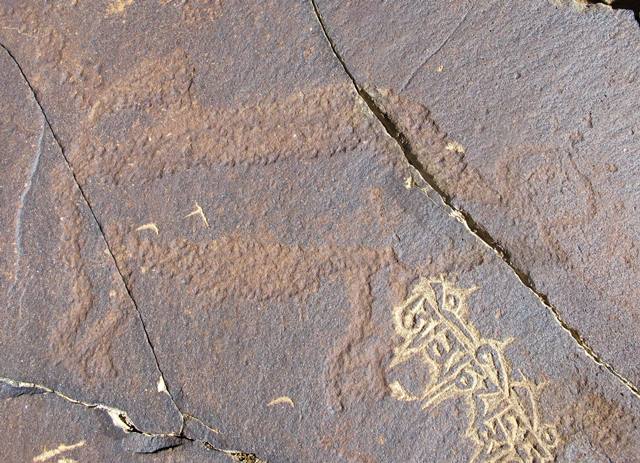
Fig. 89. Lone wild yak
Prominent motifs: wedge-shaped tail; circular horns; anterior hump; triangular snout; rounded belly; four flexed legs
Body: partially silhouetted
Technique: deeply engraved
Region: Far Western Tibet
Estimated Age: Iron Age
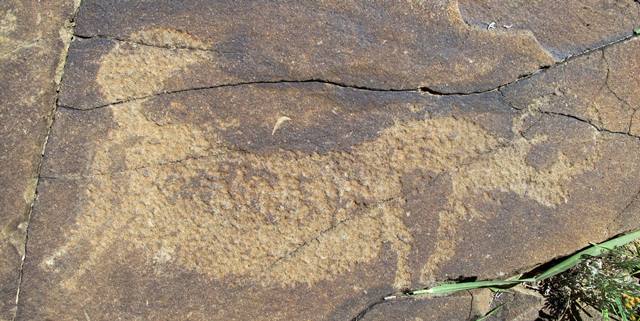
Fig. 90. Lone wild yak
Prominent motifs: wedge-shaped tail; inward curving horns; S-shaped back; square snout; rounded belly; two unflexed rear legs, one thick, unflexed front leg with foot
Body: partially silhouetted
Technique: deeply engraved
Region: Far Western Tibet
Estimated Age: Iron Age
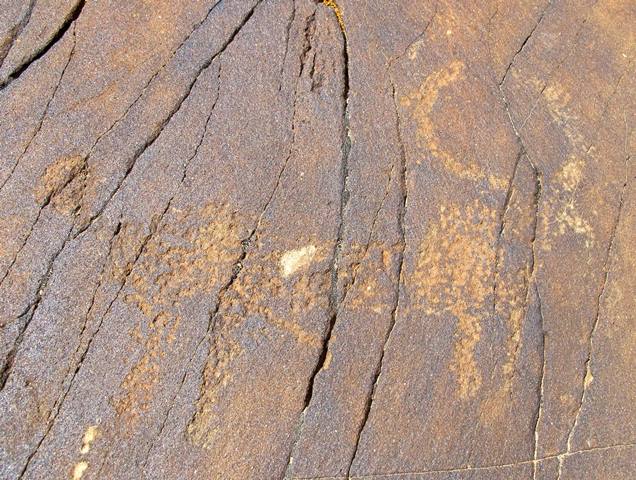
Fig. 91. Lone wild yak
Prominent motifs: wedge-shaped tail; long, inward curving horns; anterior hump; blunt snout; flat belly, male sexual organ; four unflexed legs
Body: silhouetted
Technique: moderately engraved
Region: Far Western Tibet
Estimated Age: Iron Age
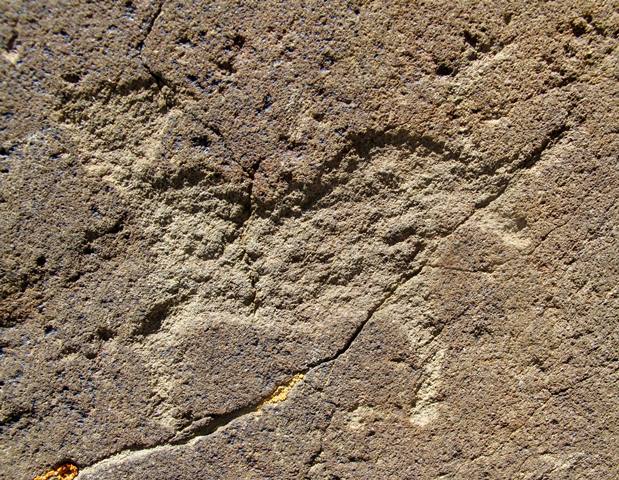
Fig. 92. Lone wild yak
Prominent motifs: large wedge-shaped tail; inward curving horns; S-shaped back; rounded snout; rounded belly; two flexed legs
Body: silhouetted
Technique: deeply engraved
Region: Far Western Tibet
Estimated Age: Iron Age
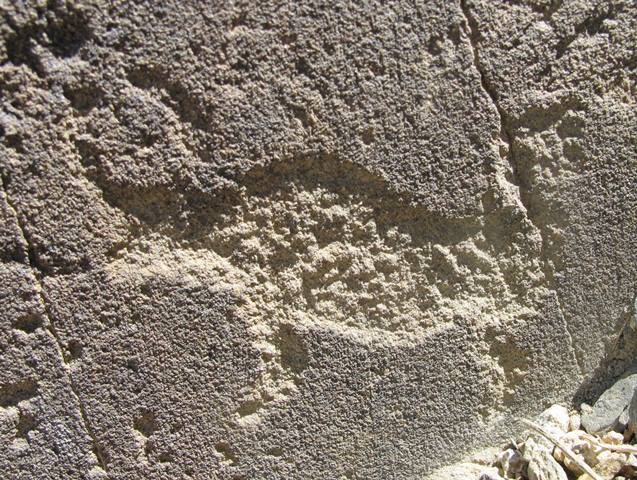
Fig. 93. Lone wild yak
Prominent motifs: large wedge-shaped tail; inward curving horns; anterior hump; rounded snout; rounded belly; two flexed legs
Body: silhouetted
Technique: very deeply engraved
Region: Far Western Tibet
Estimated Age: Iron Age
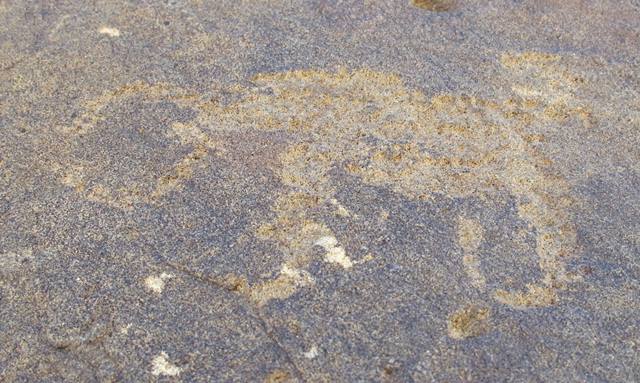
Fig. 94. Lone wild yak
Prominent motifs: wedge-shaped tail; circular horns; anterior hump; blunt snout between horns, long neck; rounded belly; two unflexed rear legs, one with foot, one unflexed front leg with foot
Body: silhouetted
Technique: moderately engraved
Region: Far Western Tibet
Estimated Age: Iron Age

Fig. 95. Lone wild yak
Prominent motifs: wedge-shaped tail; circular horns; no hump; rectangular snout; flat belly; two rear unflexed legs, one unflexed front leg
Body: silhouetted
Technique: deeply engraved
Region: Far Western Tibet
Estimated Age: Iron Age
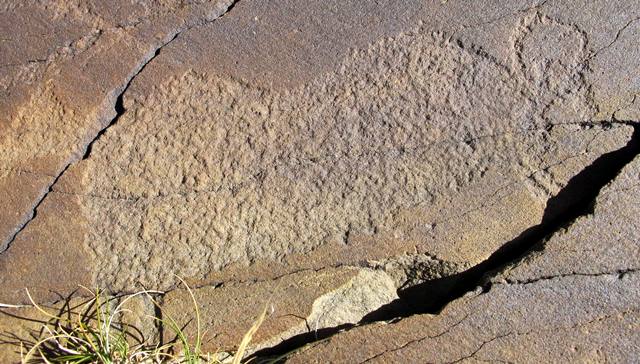
Fig. 96. Lone wild yak
Prominent motifs: wedge-shaped tail; circular horns; S-shaped back; square snout; flat belly; four unflexed legs
Body: silhouetted
Technique: deeply engraved
Region: Far Western Tibet
Estimated Age: Late Bronze Age or Iron Age
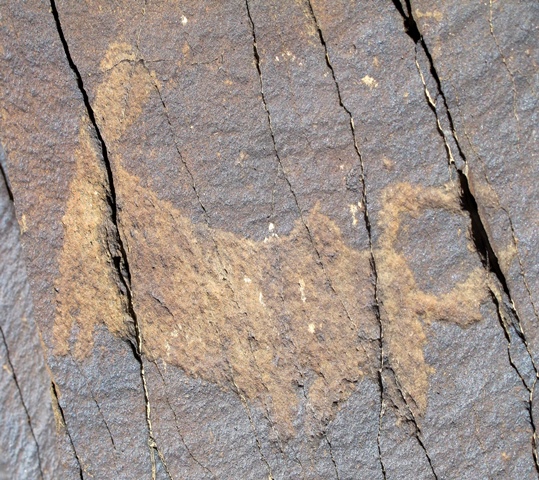
Fig. 97. Lone wild yak
Prominent motifs: wedge-shaped tail; inward curving horns with right angle; small anterior hump; triangular snout; flat belly; four unflexed legs
Body: silhouetted
Technique: deeply engraved
Region: Far Western Tibet
Estimated Age: Iron Age
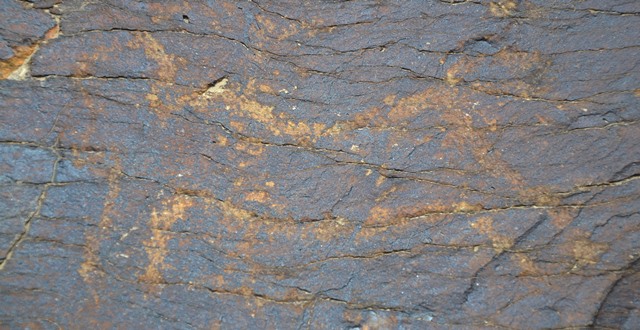
Fig. 98. Lone wild yak
Prominent motifs: wedge-shaped tail; circular horns; small anterior hump; blunt snout, top of head open; rounded belly; four unflexed legs
Body: outlined
Technique: moderately engraved
Region: Far Western Tibet
Estimated Age: Iron Age
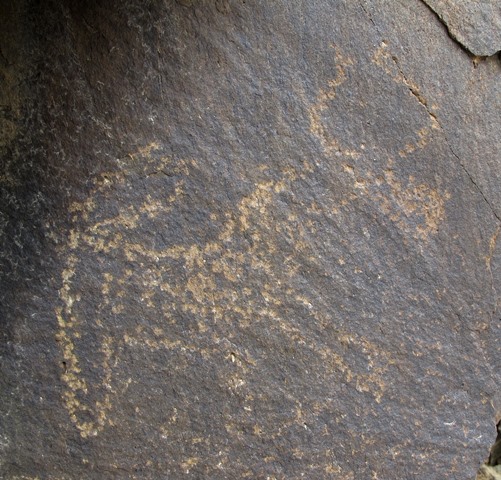
Fig. 99. Lone wild yak
Prominent motifs: wedge-shaped tail; double curved horns; anterior hump; rectangular snout, long neck; rounded belly; two thick, unflexed legs
Body: partially silhouetted
Technique: moderately engraved
Region: Far Western Tibet
Estimated Age: Iron Age or Protohistoric period
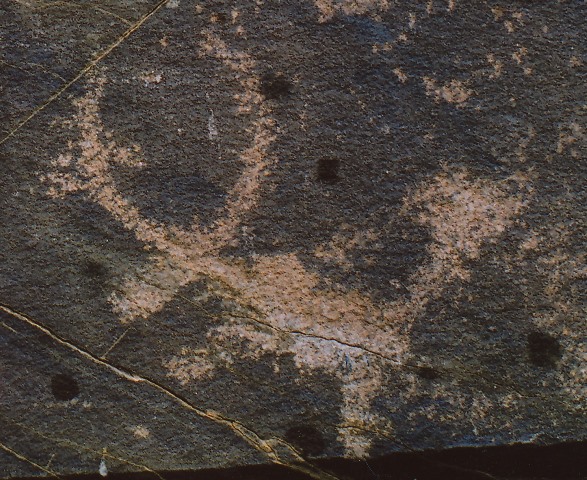
Fig. 100. Lone wild yak
Prominent motifs: large wedge-shaped tail; long, inward curving horns; small anterior hump; rectangular snout; rounded belly; two thick, unflexed legs
Body: silhouetted
Technique: moderately engraved
Region: Far Western Tibet
Estimated Age: Iron Age or Protohistoric period

Fig. 101. Lone wild yak and sun that appear to form an integral composition
Prominent motifs: wedge-shaped tail; circular horns; small anterior hump; rounded snout; flat belly; four unflexed legs
Body: outlined
Technique: moderately engraved
Region: Far Western Tibet
Estimated Age: Iron Age or Protohistoric period
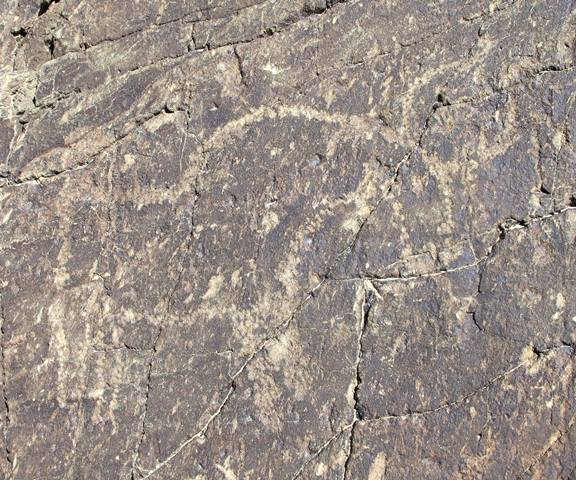
Fig. 102. Lone wild yak
Prominent motifs: wedge-shaped tail; double curved horns; anterior hump; rounded snout, long neck; flat belly; four unflexed legs
Body: outlined
Technique: moderately engraved
Region: Far Western Tibet
Estimated Age: Iron Age or Protohistoric period
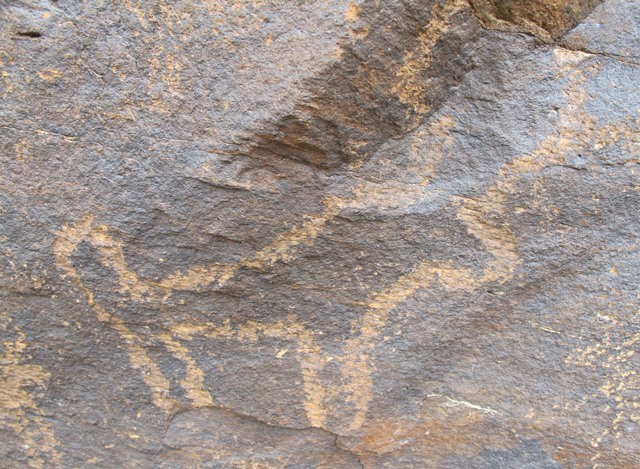
Fig. 103. Lone wild yak
Prominent motifs: wedge-shaped tail; long double curved horns, top of head open; anterior hump; triangular snout; flat belly; two unflexed legs open on ends
Body: outlined
Technique: moderately engraved
Region: Far Western Tibet
Estimated Age: Iron Age or Protohistoric period

Fig. 104. Lone wild yak
Prominent motifs: wedge-shaped tail; thick, inward curving horns; no anterior hump; hooked snout; flat belly; four unflexed legs
Body: silhouetted
Technique: moderately engraved
Region: Far Western Tibet
Estimated Age: Iron Age or Protohistoric period
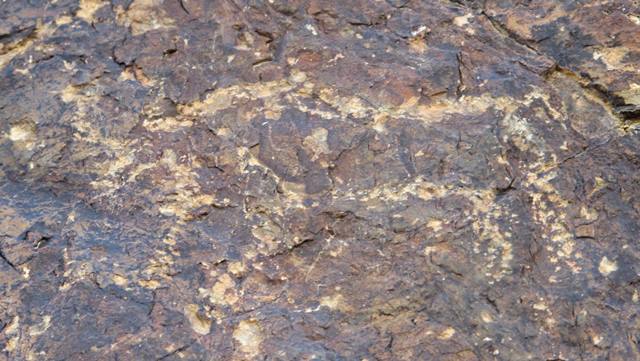
Fig. 105. Lone wild yak
Prominent motifs: wedge-shaped tail; inward curving horns; anterior hump; triangular snout; flat belly; four unflexed legs
Body: outlined
Technique: moderately engraved
Region: Far Western Tibet
Estimated Age: Protohistoric period
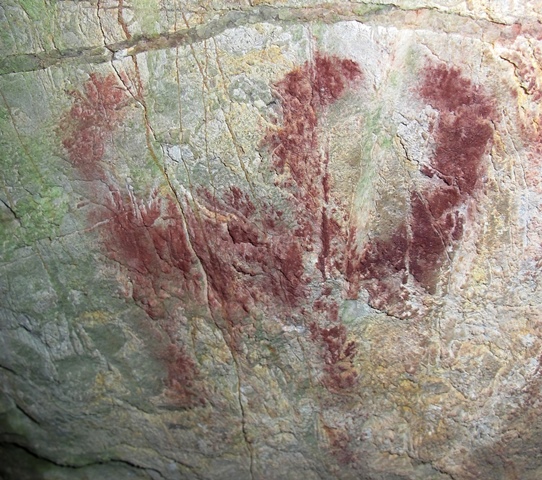
Fig. 106. Lone wild yak
Prominent motifs: wedge-shaped tail; thick, inward curving horns; anterior hump; blunt snout; flat belly; two unflexed legs
Body: silhouetted
Technique: painted, red ochre
Region: Eastern Changthang
Estimated Age: Protohistoric period
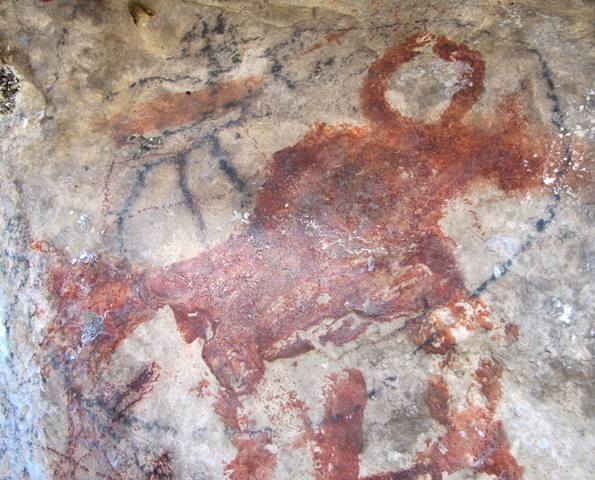
Fig. 107. Lone wild yak
Prominent motifs: wedge-shaped tail; inward curving horns; anterior hump; rectangular snout; flat belly; four unflexed legs
Body: silhouetted
Technique: painted, red ochre
Region: Eastern Changthang
Estimated Age: Protohistoric period
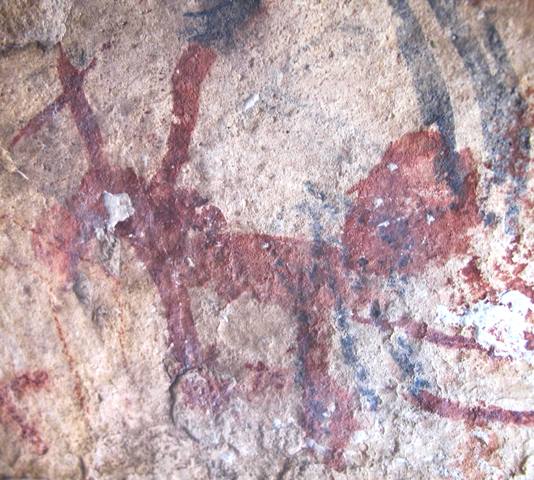
Fig. 108. Lone wild yak
Prominent motifs: large wedge-shaped tail; forked horns; anterior hump; rectangular snout; flat belly; two thick, unflexed legs
Body: silhouetted
Technique: painted, red ochre
Region: Eastern Changthang
Estimated Age: Protohistoric period
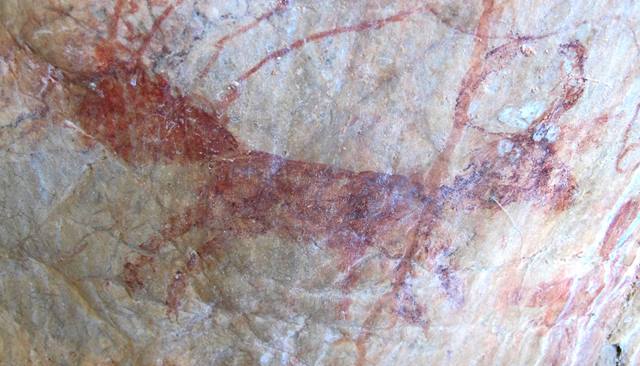
Fig. 109. Lone wild yak
Prominent motifs: large wedge-shaped tail; inward curving horns; no hump; rounded snout, long neck; flat belly; four unflexed legs
Body: silhouetted
Technique: painted, red ochre
Region: Eastern Changthang
Estimated Age: Early Historic period
Group 6: Wild yaks with wedge-shaped tail pointing downward and belly fringe
This group is defined by wild yaks with wedge-shaped tails pointing below the level of the back and belly fringes. It is characterized by a more restricted ensemble of motifs and chronology than other groups illustrated thus far. This category of wild yak rock art, however, is distributed across the breadth of Upper Tibet.
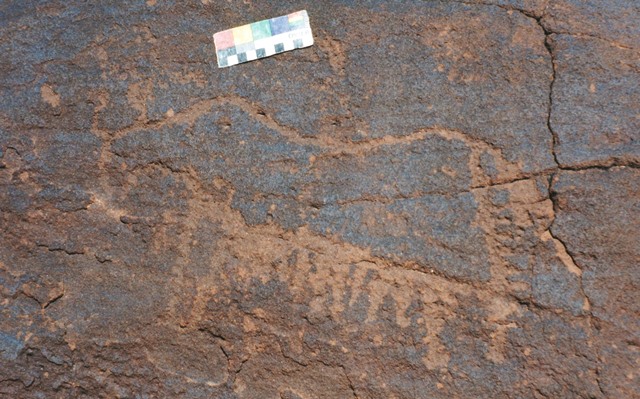
Fig. 110. Lone wild yak
Prominent motifs: wedge-shaped tail; double curved horns; S-shaped back; rounded snout, long neck; flat belly, long hairy fringe; two unflexed rear legs, one unflexed front leg
Body: outlined
Technique: moderately engraved
Region: Western Changthang
Estimated Age: Iron Age
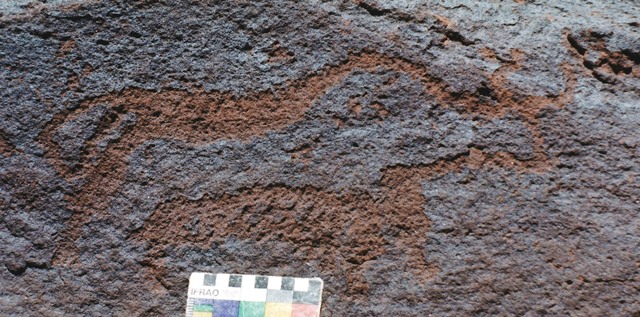
Fig. 111. Lone wild yak
Prominent motifs: wedge-shaped tail; inward curving horns with flared ends; anterior hump; rounded snout; arched belly, long hairy fringe; four unflexed legs
Body: partially silhouetted
Technique: moderately engraved
Region: Western Changthang
Estimated Age: Iron Age
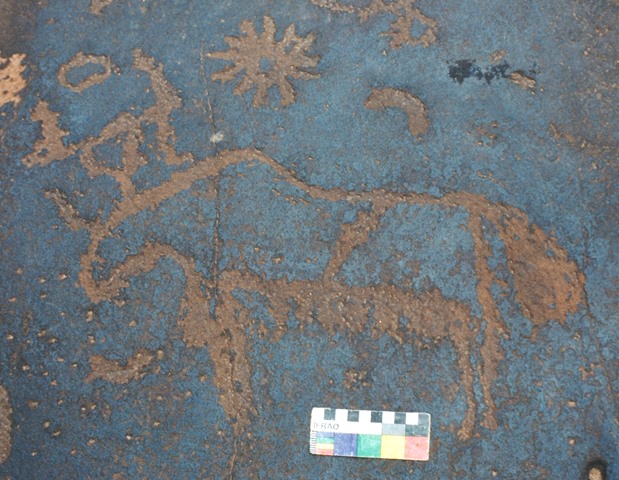
Fig. 112. Lone wild yak with circle between the horns and two crescent moons and sun that appear to form an integral composition (head of horseman at top of image appears to be part of another composition)
Prominent motifs: wedge-shaped tail; double curved horns joined by horizontal line; anterior hump; rounded snout; flat belly, hairy fringe; one unflexed rear leg open on end, one thick front leg
Body: outlined, divided by vertical line into two halves
Technique: moderately engraved
Region: Western Changthang
Estimated Age: Iron Age
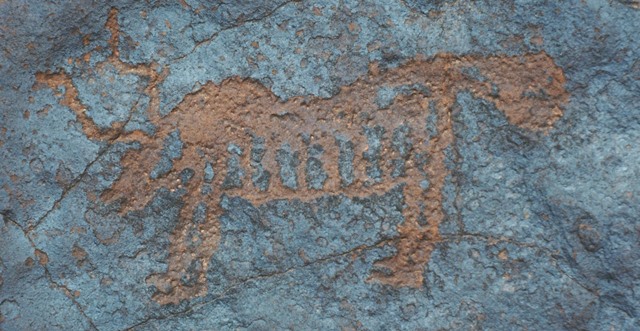
Fig. 113. Lone wild yak
Prominent motifs: large wedge-shaped tail; long, double curved horns; anterior hump; rectangular snout; flat belly, hairy fringe; four long, unflexed legs with feet
Body: silhouetted
Technique: moderately engraved
Region: Western Changthang
Estimated Age: Iron Age
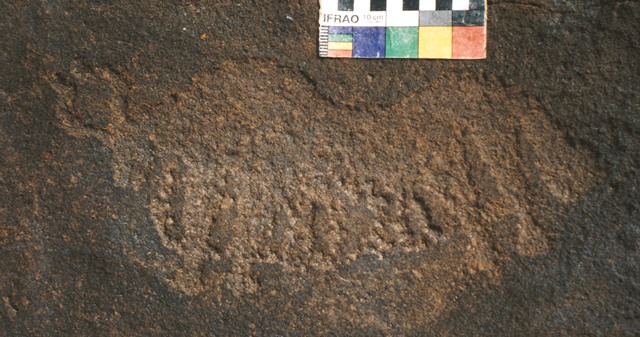
Fig. 114. Lone wild yak Prominent motifs: wedge-shaped tail; double curved horns; S-shaped back; square snout; rounded belly, long hairy fringe; four long, unflexed legs with feet
Body: silhouetted
Technique: deeply engraved
Region: Western Changthang
Estimated Age: Iron Age
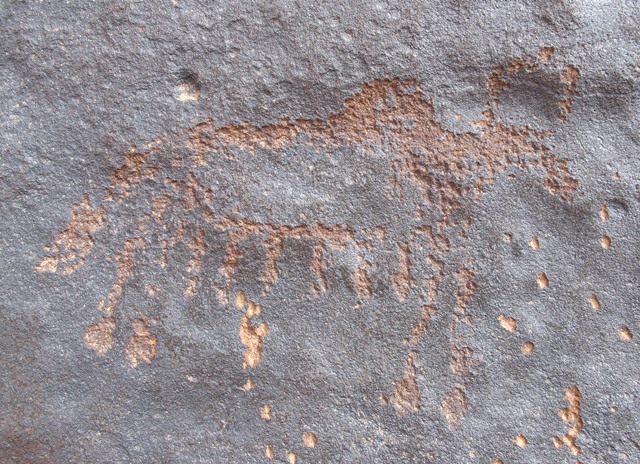
Fig. 115. Lone wild yak
Prominent motifs: wedge-shaped tail; inward curving horns; anterior hump; rectangular snout; rounded belly, long hairy fringe; four long, unflexed legs with feet
Body: partially silhouetted
Technique: moderately engraved
Region: Western Changthang
Estimated Age: Iron Age
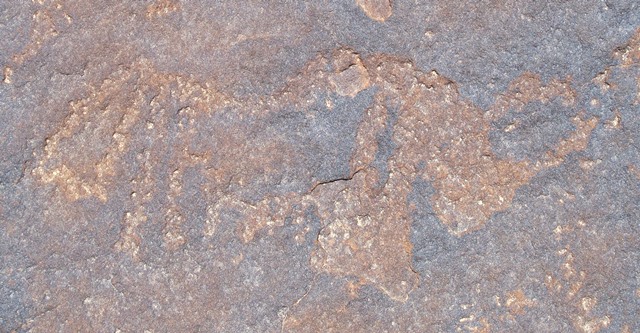
Fig. 116. Lone wild yak
Prominent motifs: wedge-shaped tail; inward curving horns; S-shaped back; rounded snout; rounded belly, hairy fringe; four unflexed legs
Body: partially silhouetted
Technique: moderately engraved
Region: Western Changthang
Estimated Age: Iron Age
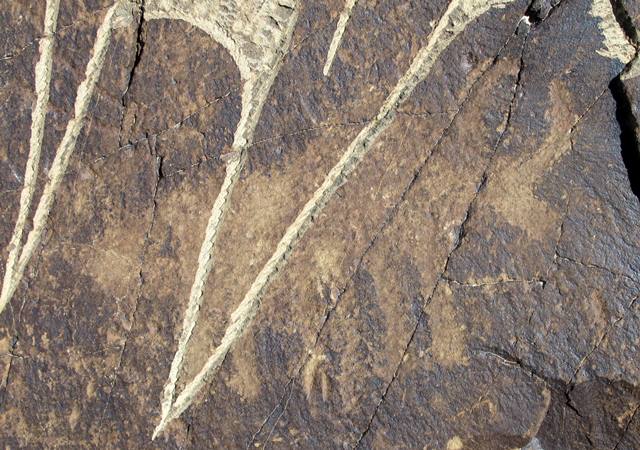
Fig. 117. Lone wild yak with Buddhist mantra superimposed
Prominent motifs: wedge-shaped tail; inward curving horns; anterior hump; square snout; flat belly, long hairy fringe; four unflexed legs
Body: silhouetted
Technique: moderately engraved
Region: Far Western Tibet
Estimated Age: Iron Age or Protohistoric period
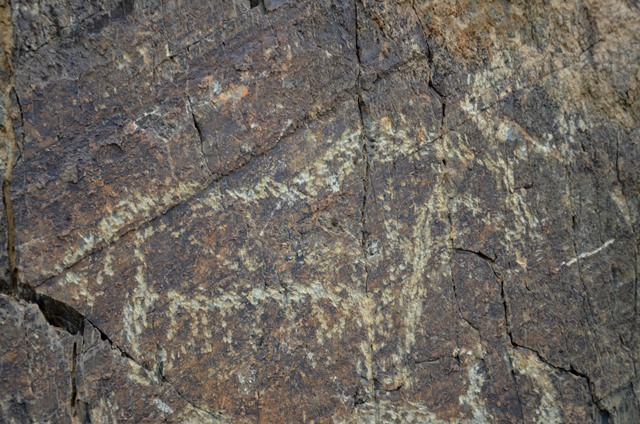
Fig. 118. Wild yak, retouched, and at least six other wild yaks (not pictured) that may in part or in whole form an integral composition
Prominent motifs: wedge-shaped tail; forked horns; anterior hump; rectangular snout; flat belly, hairy fringe; four unflexed legs
Body: outlined
Technique: lightly engraved
Region: Far Western Tibet
Estimated Age: Protohistoric period
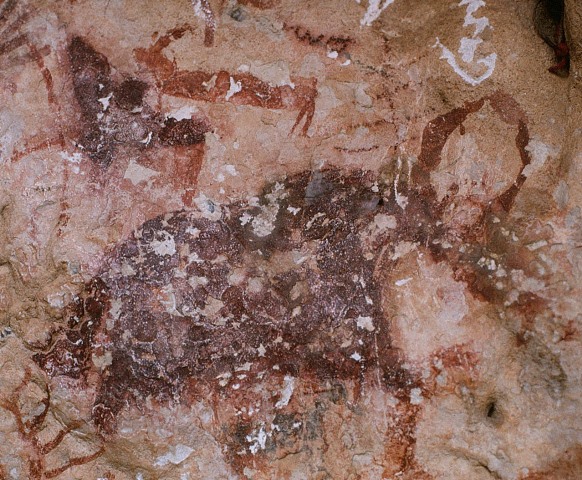
Fig. 119. Lone wild yak and raptor with outstretched wings that appear to form integral composition
Prominent motifs: wedge-shaped tail; inward curving horns; anterior hump; rounded snout; flat belly, hairy fringe; two unflexed legs
Body: silhouetted
Technique: painted, red ochre
Region: Eastern Changthang
Estimated Age: Protohistoric period
Group 7: Wild yaks with wedge-shaped tail raised upward and belly fringe
This group is defined by wild yaks with wedge-shaped tails pointing above the level of the back and belly fringes. It is characterized by a fairly wide range of motifs and is chronologically diverse, although much of it appears to date to the Iron Age. This group of wild yak rock art is spread across the breadth of Upper Tibet.
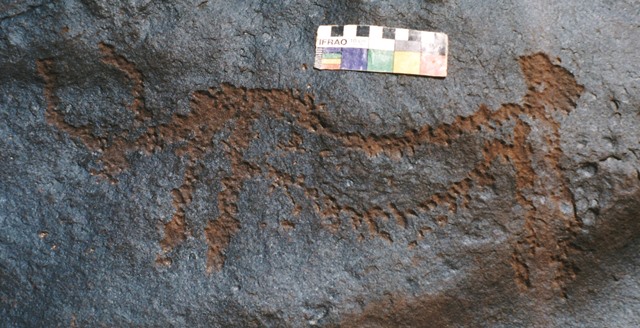
Fig. 120. Lone wild yak
Prominent motifs: wedge-shaped tail; inward curving horns; S-shaped back; square snout, long neck; rounded belly, hairy fringe; four unflexed legs
Body: outlined
Technique: moderately engraved
Region: Western Changthang
Estimated Age: Iron Age
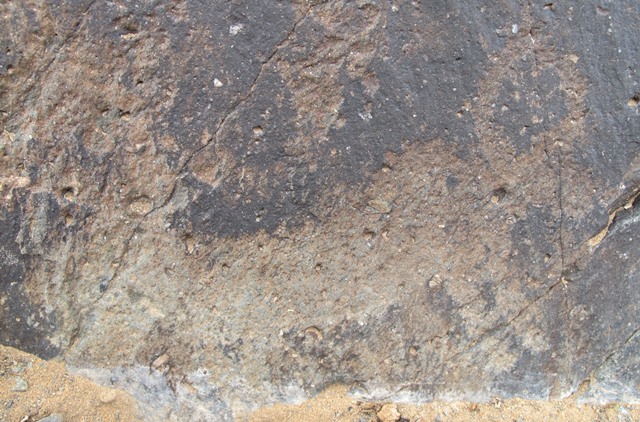
Fig. 121. Lone wild yak
Prominent motifs: wedge-shaped tail; circular horns; anterior hump; rounded snout; rounded belly, long hairy fringe; four unflexed legs
Body: silhouetted
Technique: moderately engraved
Region: Central Changthang
Estimated Age: Iron Age

Fig. 122. Wild yak possibly part of larger scene of animals
Prominent motifs: wedge-shaped tail; double curved horns; anterior hump; square snout; flat belly, long hairy fringe; two unflexed legs open on ends
Body: partially silhouetted
Technique: moderately engraved
Region: Far Western Tibet
Estimated Age: Late Bronze Age
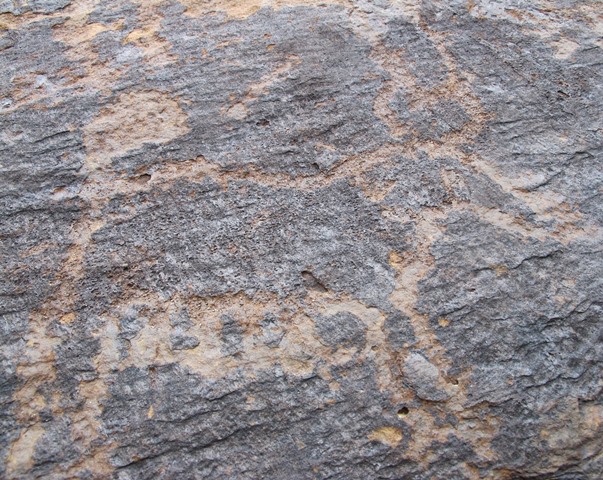
Fig. 123. Wild yak possibly part of larger scene of animals on same panel as fig. 122
Prominent motifs: wedge-shaped tail; double curved horns; anterior hump; triangular snout; flat belly, long hairy fringe; four unflexed legs
Body: outlined
Technique: moderately engraved
Region: Far Western Tibet
Estimated Age: Late Bronze Age
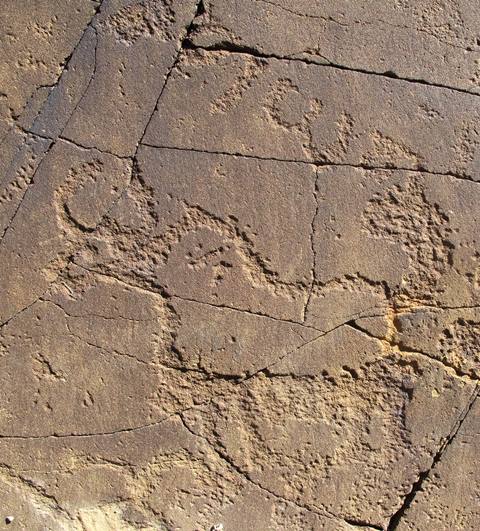
Fig. 124. Lone wild yak, inscription reading “g.yag” added at later date
Prominent motifs: wedge-shaped tail; inward curving horns; anterior hump; square snout; flat belly, hairy fringe; four unflexed legs with feet
Body: outlined
Technique: deeply engraved
Region: Far Western Tibet
Estimated Age: Iron Age
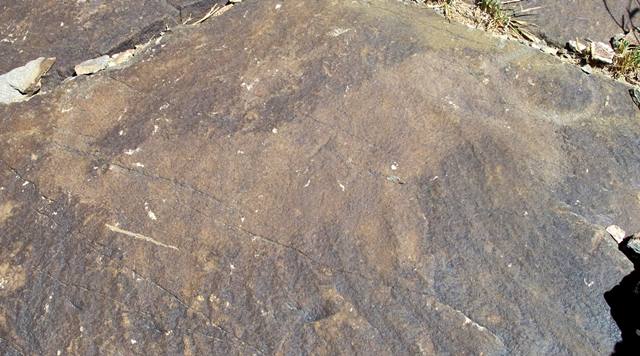
Fig. 125. Lone wild yak
Prominent motifs: wedge-shaped tail; inward curving horns; S-shaped back; square snout; flat belly, hairy fringe; four unflexed legs
Body: silhouetted
Technique: moderately engraved
Region: Far Western Tibet
Estimated Age: Iron Age
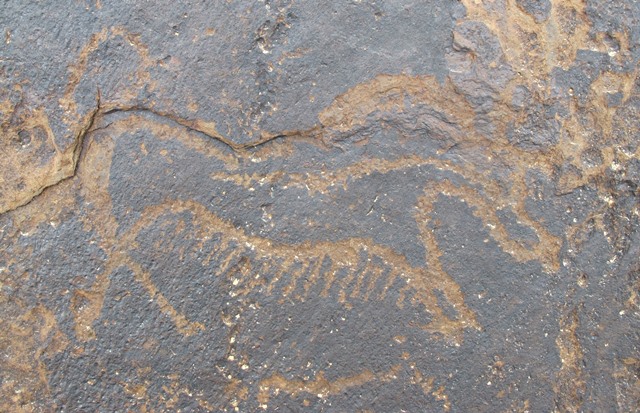
Fig. 126. Lone wild yak with non-descript lines below that may to be part of same composition
Prominent motifs: wedge-shaped tail; inward curving horns; S-shaped back; rounded snout; rounded belly, hairy fringe; crossed, unflexed rear legs, front leg open on end
Body: outlined
Technique: moderately engraved
Region: Far Western Tibet
Estimated Age: Iron Age
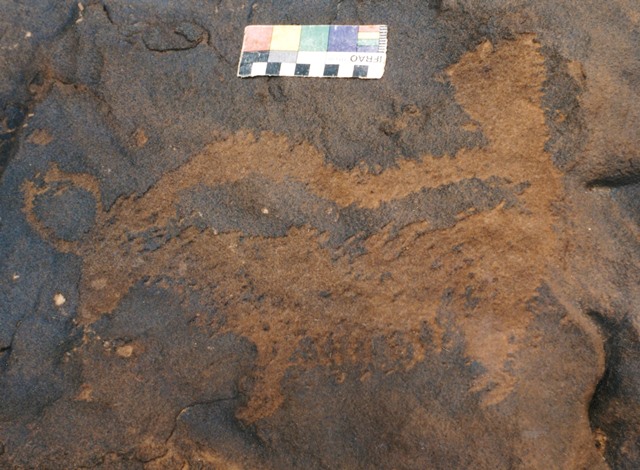
Fig. 127. Lone wild yak
Prominent motifs: wedge-shaped tail; inward curving horns with flared ends; S-shaped back; triangular snout; rounded belly, hairy fringe; two flexed legs
Body: partially silhouetted
Technique: moderately engraved
Region: Western Changthang
Estimated Age: Iron Age or Protohistoric period
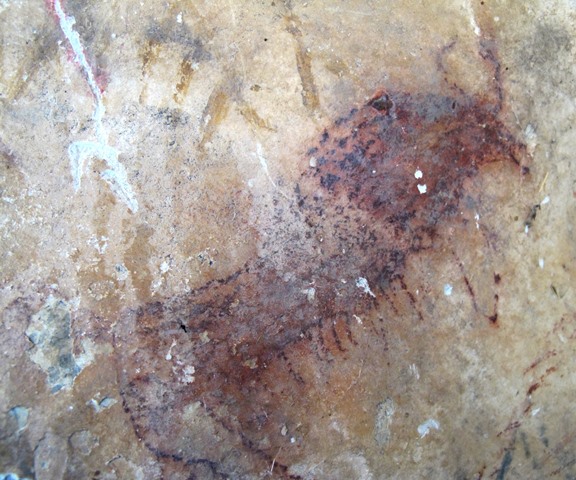
Fig. 128. Lone wild yak
Prominent motifs: wedge-shaped tail; inward curving horns; anterior hump; triangular snout; rounded belly, hairy fringe; two thick, unflexed legs
Body: Silhouetted
Technique: painted, red ochre
Region: Eastern Changthang
Estimated Age: Iron Age or Protohistoric period
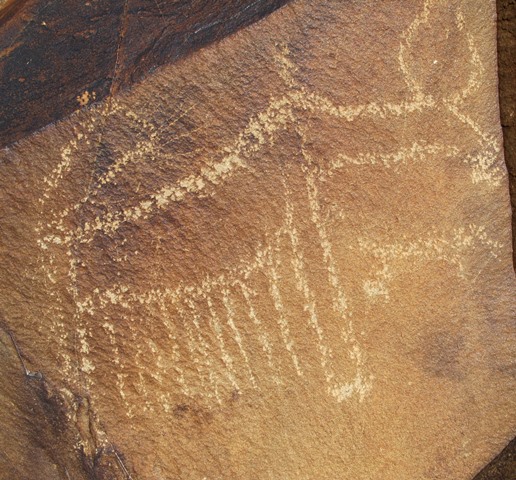
Fig. 129. Lone wild yak
Prominent motifs: wedge-shaped tail; inward curving horns with flared ends; small anterior hump; rectangular snout, long neck; rounded belly, long hairy fringe; two long, unflexed legs
Body: outlined
Technique: lightly engraved
Region: Western Changthang
Estimated Age: Protohistoric period or Early Historic period
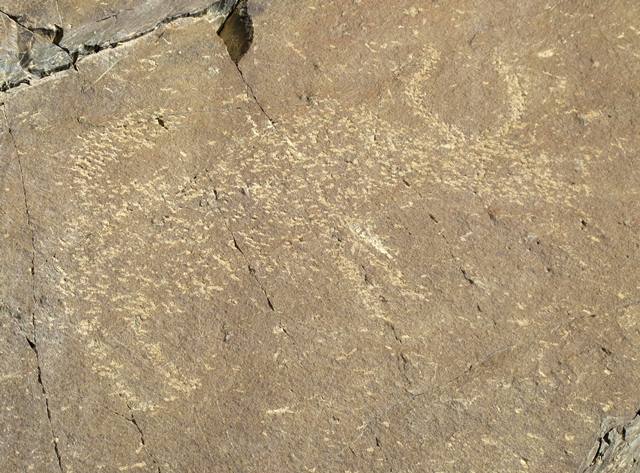
Fig. 130. Lone wild yak
Prominent motifs: wedge-shaped tail; inward curving horns; anterior hump; elongated snout; flat belly, hairy fringe; four unflexed legs
Body: silhouetted
Technique: lightly engraved
Region: Far Western Tibet
Estimated Age: Protohistoric period
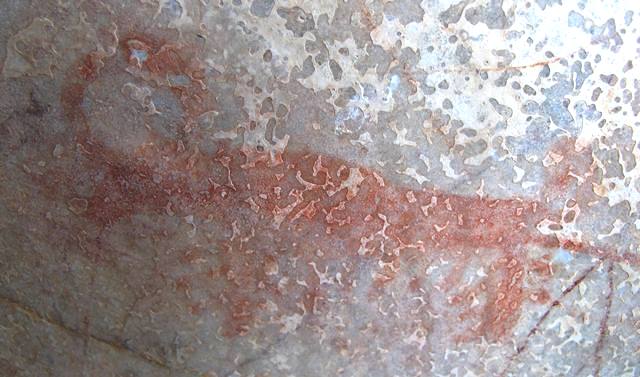
Fig. 131. Lone wild yak
Prominent motifs: wedge-shaped tail; long inward curving horns; small anterior hump; square snout; rounded belly, hairy fringe; two thick, barbed, unflexed legs
Body: silhouetted
Technique: painted, red ochre
Region: Eastern Changthang
Estimated Age: Protohistoric period or Early Historic period
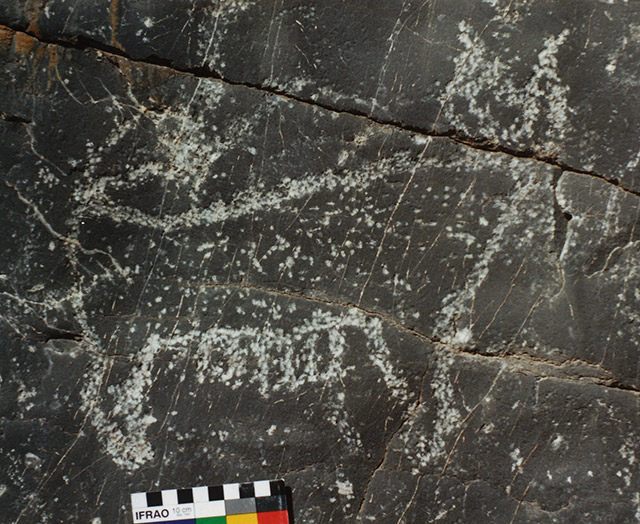
Fig. 132. Lone wild yak
Prominent motifs: wedge-shaped tail; two thick inward curving horns with flared ends; no anterior hump; blunt snout; flat belly, hairy fringe; two thick, flexed legs
Body: silhouetted
Technique: moderately engraved
Region: Far Western Tibet
Estimated Age: Early Historic period or Vestigial Period
Note: This wild yak was carved on a limestone surface which does not re-patinate well because of geochemical activity
Group 8: Wild yaks with barbed tail and belly fringe
This group of wild yaks possesses barbed (bushy) tails and hairy bellies. All tails extend above the level of the back and four of the six specimens in this group are painted, a high percentage. These painted examples also have barbed legs, representing the long leg hair of wild yak bulls. Although small, this group is defined by a fairly wide range of motifs and is chronologically diverse. It is distributed across much of Upper Tibet with a concentration in the Eastern Changthang.
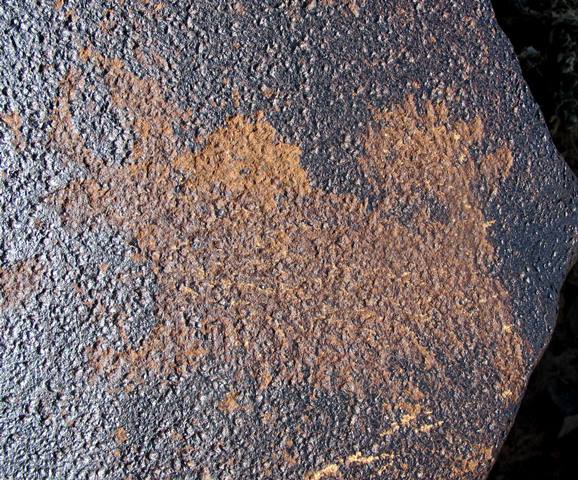
Fig. 133. Lone wild yak
Prominent motifs: barbed tail; thick inward curving horns joined at tips; anterior hump; blunt snout; flat belly, possible hairy fringe; unflexed legs
Body: silhouetted
Technique: moderately engraved
Region: Central Changthang
Estimated Age: Iron Age
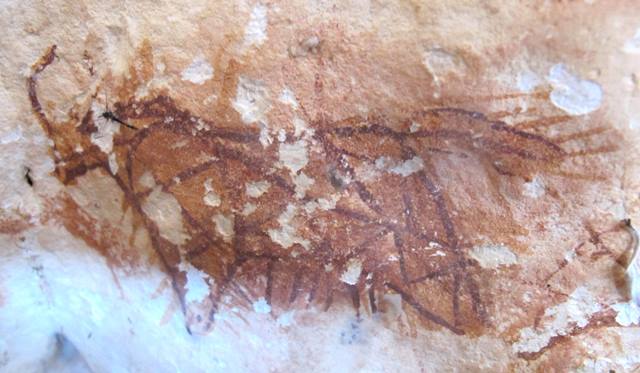
Fig. 134. Lone wild yak
Prominent motifs: barbed tail; inward curving horns; anterior hump; square snout; arched belly, hairy fringe; two V-shaped, barbed legs
Body: outlined, marked by a series of lines forming triangles
Technique: painted, red ochre, yellow ochre
Region: Eastern Changthang
Estimated Age: Iron Age
Fig. 135. Pair of wild yaks forming an integral composition
Prominent motifs: barbed tail; inward curving horns; anterior hump; blunt snout/square snout with gaping mouth; rounded belly, hairy fringe; two unflexed legs
Body: silhouetted
Technique: deeply engraved
Region: Far Western Tibet
Estimated Age: Iron Age or Protohistoric period
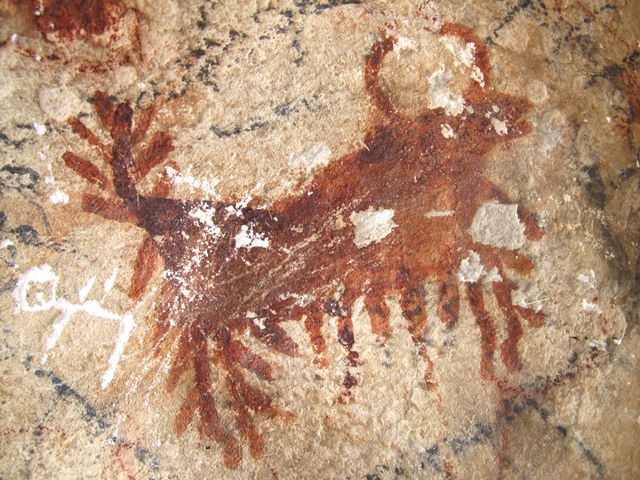
Fig. 136. Lone wild yak
Prominent motifs: barbed tail; inward curving horns; anterior hump; square snout possibly with open mouth; flat belly, long hairy fringe; two barbed, flexed legs open on ends
Body: silhouetted
Technique: painted, red ochre
Region: Eastern Changthang
Estimated Age: Protohistoric period
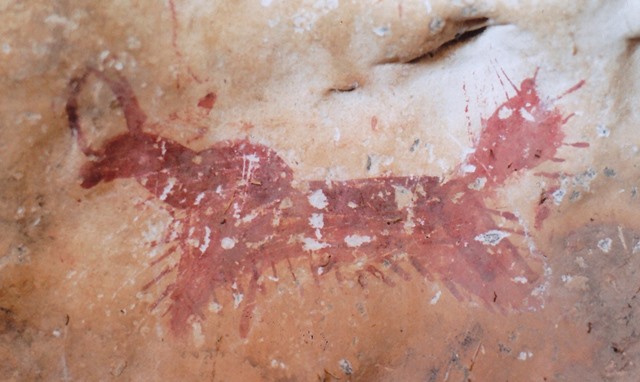
Fig. 137. Lone wild yak
Prominent motifs: barbed tail; circular horns; anterior hump; square snout, long neck; arched belly, hairy fringe; two barbed, V-shaped legs
Body: silhouetted
Technique: painted, red ochre
Region: Eastern Changthang
Estimated Age: Protohistoric period or Early Historic period
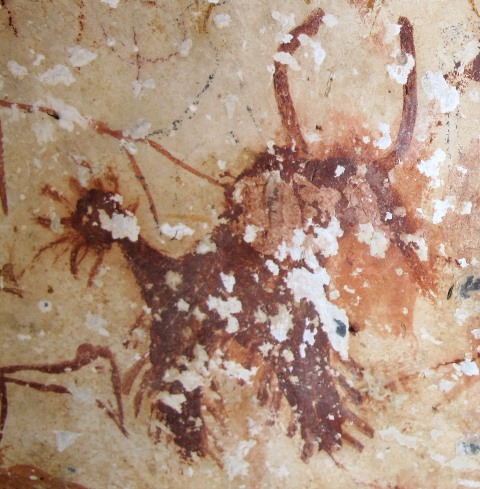
Fig. 138. Lone wild yak, head damaged
Prominent motifs: long barbed tail; inward curving horns; anterior hump; snout; arched belly, hairy fringe; two thick, barbed, unflexed legs
Body: silhouetted
Technique: painted, red ochre
Region: Eastern Changthang
Estimated Age: Protohistoric period or Early Historic period
Group 9: Wild yaks with S-shaped or volute body ornamentation
This group of wild yaks is characterized by body ornamentation consisting of a centrally placed S-shaped or double volute motif. This conspicuous motif and the underlying curvilinear schema of wild yaks in this category belong to the Upper Tibetan branch of the so-called Eurasian animal style, which spread to many parts of the continent in the Iron Age. All specimens are found in far northwestern Tibet, a region with strong links in antiquity to other parts of Inner Asia. These wild yaks present a fairly varied range of stylistic and technical qualities. All but one specimen have tails that point upward. The group is mostly assigned to the Iron Age.
Fig. 139. Lone wild yak, rear partly missing
Prominent motifs: upward pointing wedge-shaped tail; two inward curving horns; anterior hump; square snout; arched belly, hairy fringe; flexed legs with feet
Body: outlined, double volute motif
Technique: deeply engraved
Region: Far Western Tibet
Estimated Age: Iron Age
Note: This wild yak is carved opposite specimen in fig. 140 on same panel
Fig. 140. Lone wild yak, bottom missing
Prominent motifs: upward pointing wedge-shaped tail; two inward curving horns; anterior hump; square snout; flat belly
Body: outlined, double volute motif
Technique: deeply engraved
Region: Far Western Tibet
Estimated Age: Iron Age
Fig. 141. Lone wild yak
Prominent motifs: upward pointing wedge-shaped tail; two inward curving horns; small anterior hump; square; arched belly; four unflexed legs
Body: outlined, S-shaped motif
Technique: moderately engraved
Region: Far Western Tibet
Estimated Age: Iron Age
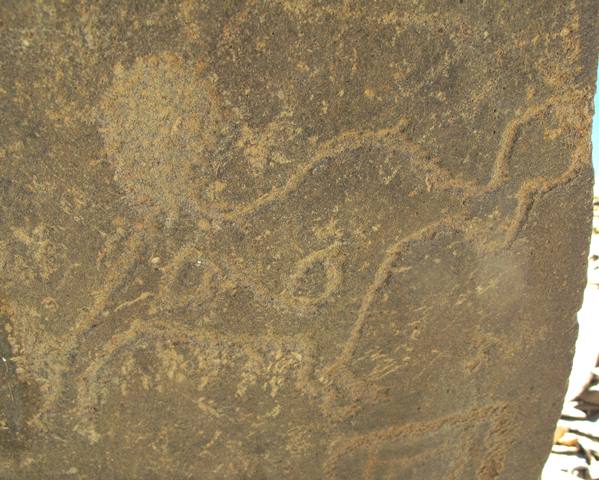
Fig. 142. Lone wild yak
Prominent motifs: large, upward pointing, slightly splayed ball-shaped tail; two inward curving horns; anterior hump; blunt snout; flat belly, belly fringe; four flexed legs with feet
Body: outlined, double volute motif
Technique: deeply engraved
Region: Far Western Tibet
Estimated Age: Iron Age
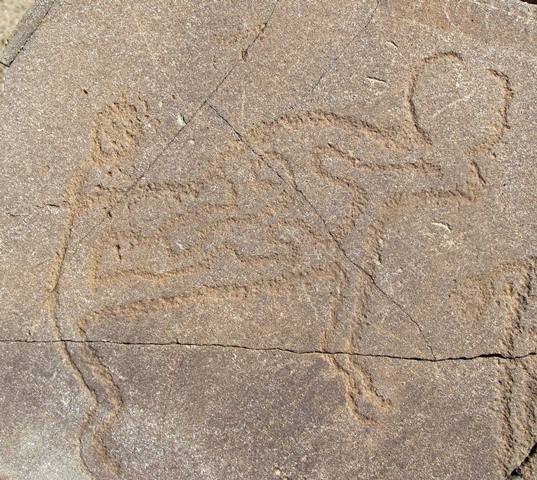
Fig. 143. Lone wild yak
Prominent motifs: upward pointing ball-shaped tail; two inward curving horns, top of head open; anterior hump; square snout; flat belly, two flexed legs
Body: outlined, volutes and meandering line motif
Technique: deeply engraved
Region: Far Western Tibet
Estimated Age: Iron Age
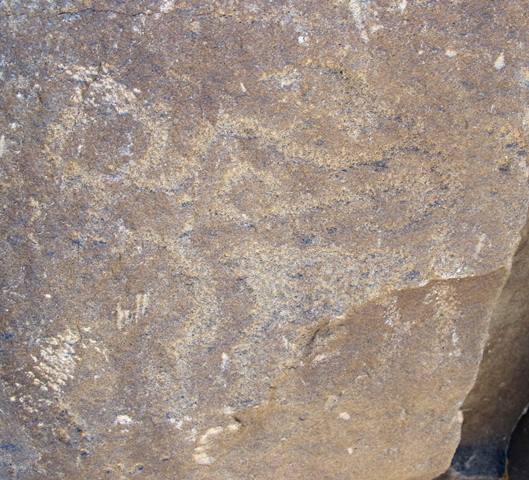
Fig. 144. Lone wild yak
Prominent motifs: upward pointing wedge-shaped tail; two inward curving horns; S-shaped back; rectangular snout; flat belly; four flexed legs
Body: outlined, double volute motif
Technique: moderately engraved
Region: Far Western Tibet
Estimated Age: Iron Age
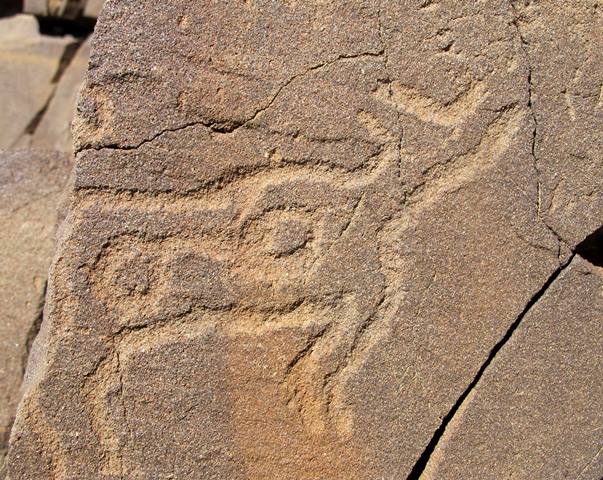
Fig. 145. Lone wild yak, rear portion missing
Prominent motifs: upward pointing ball-shaped tail; two short, straight horns, top of head open, long neck; anterior hump; rectangular snout with gaping mouth, long neck; flat belly; two flexed legs open on ends
Body: outlined, double volute motif
Technique: deeply engraved
Region: Far Western Tibet
Estimated Age: Iron Age
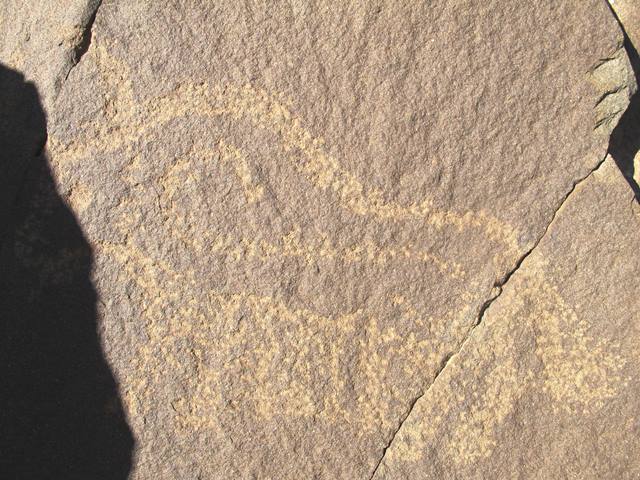
Fig. 146. Lone wild yak
Prominent motifs: downward pointing wedge-shaped tail; inward curving horns; S-shaped back; square snout; flat belly, long belly fringe; four unflexed legs
Body: outlined, double volute motif
Technique: moderately engraved
Region: Far Western Tibet
Estimated Age: Iron Age of Protohistoric period
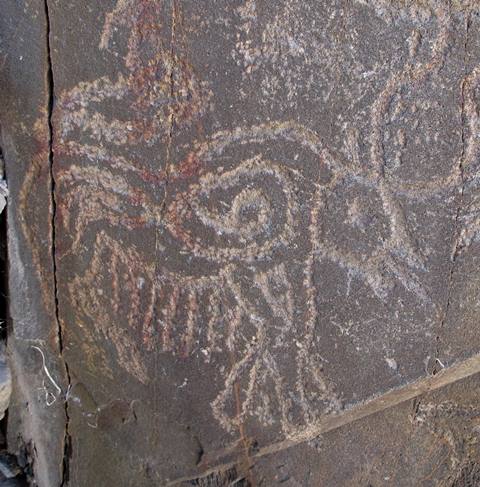
Fig. 147. Wild yak with other animals, anthropomorphs and symbols (not pictured) that appear to form an integral composition
Prominent motifs: upward pointing wedge-shaped tail; double curved horns; S-shaped back; triangular snout with gaping mouth and tongue; rounded belly, long belly fringe; four flexed legs
Body: outlined, double volute motif
Technique: deeply engraved
Region: Far Western Tibet
Estimated Age: Protohistoric period
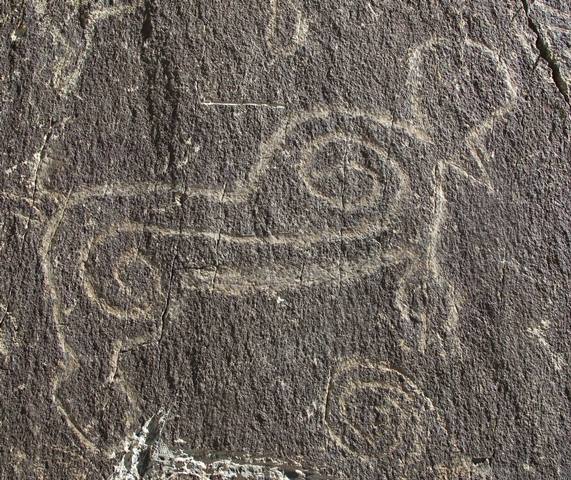
Fig. 148. Wild yak with two stags in the Eurasian animal style (not pictured) that appear to form an integral composition
Prominent motifs: upward pointing linear tail; inward curving horns, top of head open; S-shaped back; triangular snout; rounded belly; four flexed legs
Body: outlined, double volute motif
Technique: moderately engraved
Region: Far Western Tibet
Estimated Age: Protohistoric period
Group 10: Wild yaks with segmented body ornamentation
Although this is a small group made up entirely of petroglyphs from northwestern Tibet, each specimen is highly distinctive stylistically and several different carving techniques are displayed. The group appears to be closely related chronologically with all but one of the five examples assigned to the Iron Age.
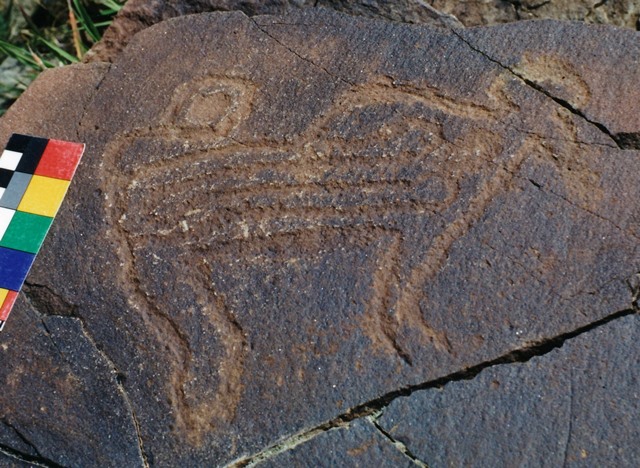
Fig. 149. Lone wild yak
Prominent motifs: long, upward pointing ball-shaped tail; circular horns, top of head open; anterior hump; square snout; flat belly; four flexed legs
Body: outlined, horizontal parallel lines with anterior round extension motif
Technique: deeply engraved
Region: Far Western Tibet
Estimated Age: Iron Age
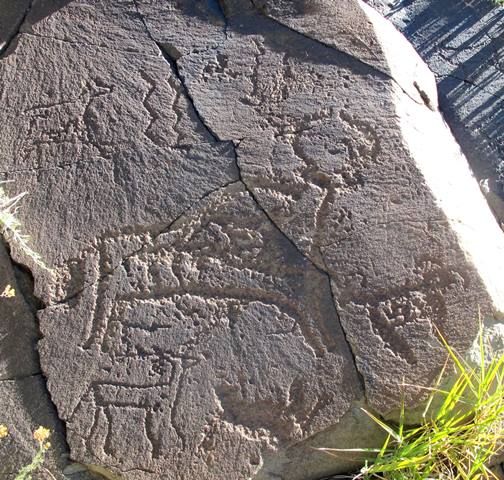
Fig. 150. Lone wild yak with four other wild ungulates, zigzag lines and minor markings, some of which probably form integral composition
Prominent motifs: downward pointing wedge-shaped tail; inward curving horns with flared tips; anterior hump; blunt snout; arched belly; two unflexed legs with open ends
Body: outlined, linear markings motif
Technique: deeply engraved
Region: Far Western Tibet
Estimated Age: Iron Age
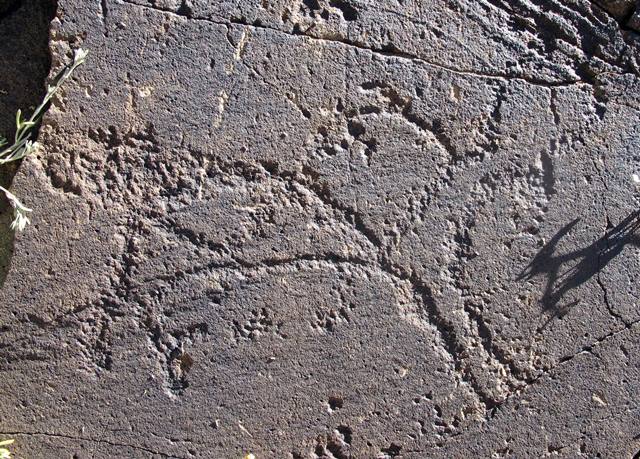
Fig. 151. Lone wild yak
Prominent motifs: upward pointing wedge-shaped tail; inward curving horns, top of head open; anterior hump; rounded snout; arched belly; four unflexed legs
Body: partially silhouetted, diagonal lines forming four triangles motif
Technique: deeply engraved
Region: Far Western Tibet
Estimated Age: Iron Age
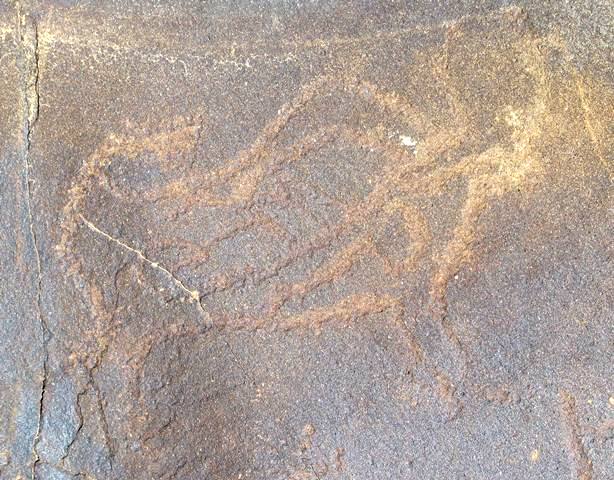
Fig. 152. Lone wild yak
Prominent motifs: upward pointing wedge-shaped tail; inward curving horns, top of head open; anterior hump; blunt snout; flat belly; four flexed legs
Body: outlined, complex curvilinear motif
Technique: moderately engraved
Region: Far Western Tibet
Estimated Age: Iron Age
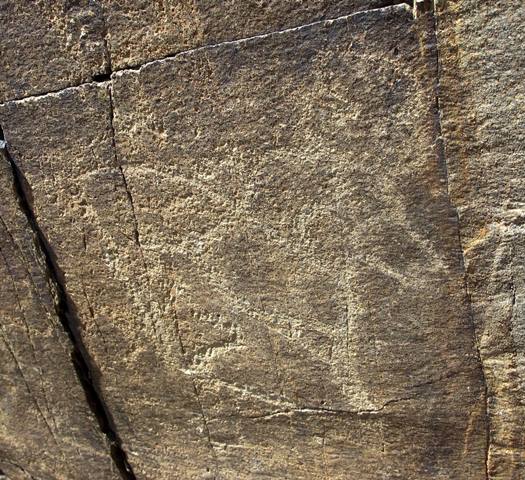
Fig. 153. Lone wild yak
Prominent motifs: long, upward pointing linear tail; double curved horns joined at the tips; S-shaped back; rectangular snout; rounded belly; wedge-shaped rear leg, unflexed front leg
Body: outlined, X-shaped motif and other lines
Technique: moderately engraved
Region: Far Western Tibet
Estimated Age: Protohistoric period
Group 11: Wild yaks with linear tail pointing downward
This group of wild yaks is defined by linear tails that point below the level of the back. It is otherwise a diverse assemblage without many other common motifs or techniques of production. It is also chronologically and geographically quite diverse.
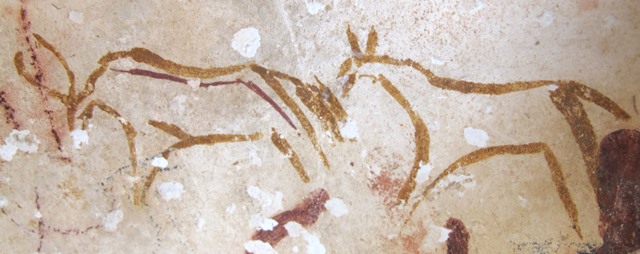
Fig. 154. Wild yak and possible wild ass forming an integral composition
Prominent motifs: long linear tail; inward curving horns; anterior hump; triangular snout; flat belly; two unflexed rear legs, V-shaped front leg
Body: outlined, line paralleling back
Technique: painted, yellow ochre, red ochre
Region: Eastern Changthang
Estimated Age: Late Bronze Age or Iron Age
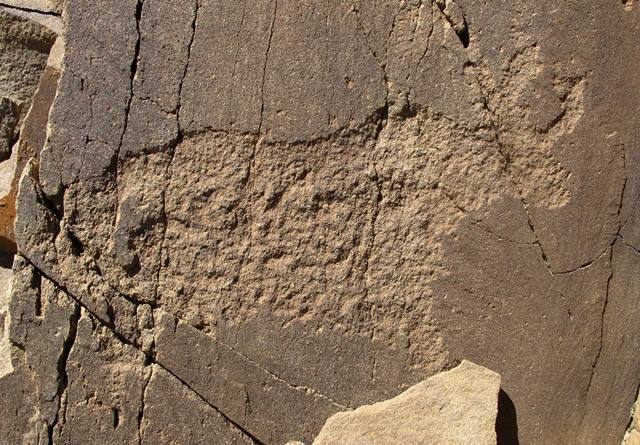
Fig. 155. Lone wild yak
Prominent motifs: linear tail; inward curving horns; S-shaped back; rounded snout; arched belly; two V-shaped legs
Body: silhouetted
Technique: deeply engraved
Region: Far Western Tibet
Estimated Age: Iron Age
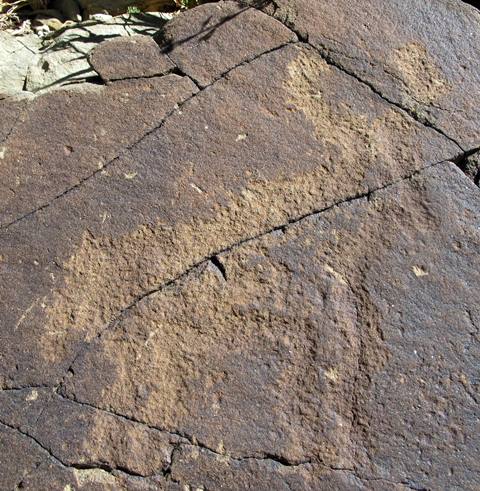
Fig. 156. Lone wild yak
Prominent motifs: linear tail; inward curving horns; anterior hump; triangular snout; arched belly; four flexed legs
Body: partially silhouetted
Technique: deeply engraved
Region: Far Western Tibet
Estimated Age: Iron Age
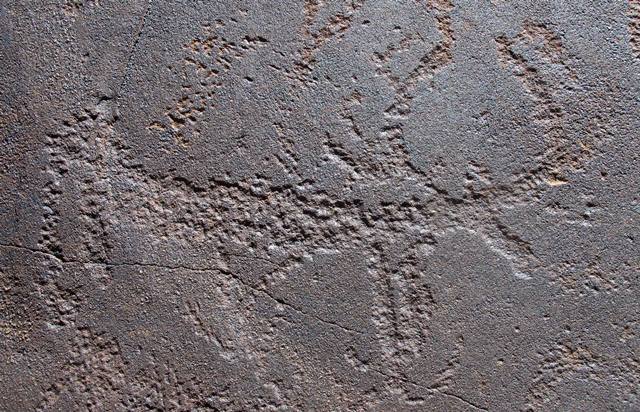
Fig. 157. Wild yak with stag and two or three other wild yaks (not pictured) that appear to form an integral composition
Prominent motifs: short linear tail; long, inward curving horns; small anterior hump; rectangular snout; flat belly; four unflexed legs
Body: silhouetted
Technique: moderately engraved
Region: Far Western Tibet
Estimated Age: Iron Age
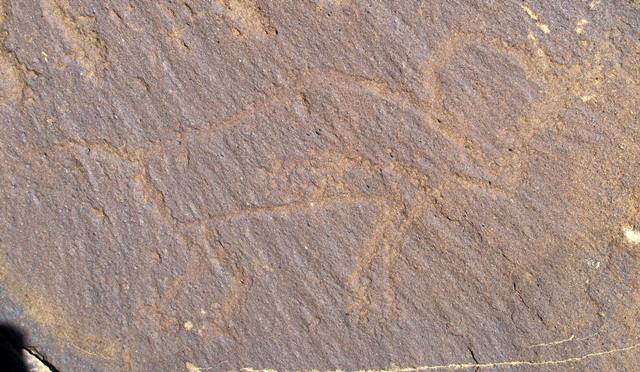
Fig. 158. Lone wild yak
Prominent motifs: linear tail; circular horns; anterior hump; blunt snout; flat belly; four flexed legs
Body: outlined, markings
Technique: moderately engraved
Region: Far Western Tibet
Estimated Age: Iron Age
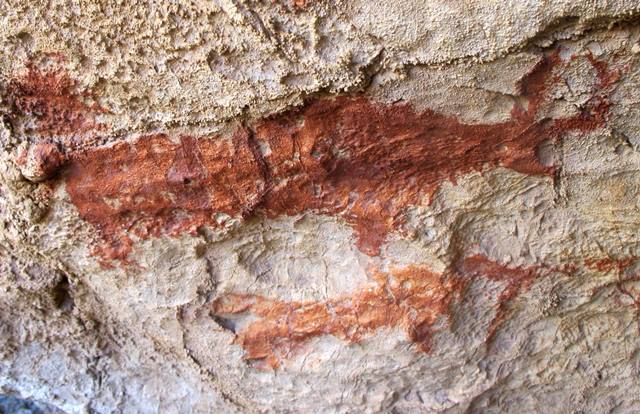
Fig. 159. Lone wild yak with other wild ungulate below
Prominent motifs: linear tail; inward curving horns; anterior hump; blunt snout; flat belly; two unflexed legs
Body: silhouetted
Technique: painted, red ochre
Region: Far Western Tibet
Estimated Age: Iron Age or Protohistoric period
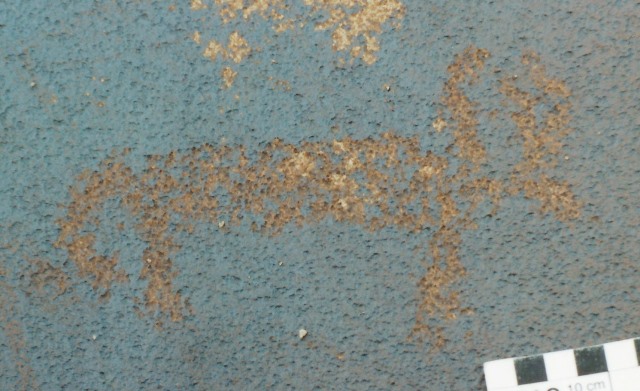
Fig. 160. Lone wild yak
Prominent motifs: long linear tail; inward curving horns; no hump; hooked snout; flat belly; two unflexed legs
Body: silhouetted
Technique: moderately engraved
Region: Central Changthang
Estimated Age: Iron Age or Protohistoric period
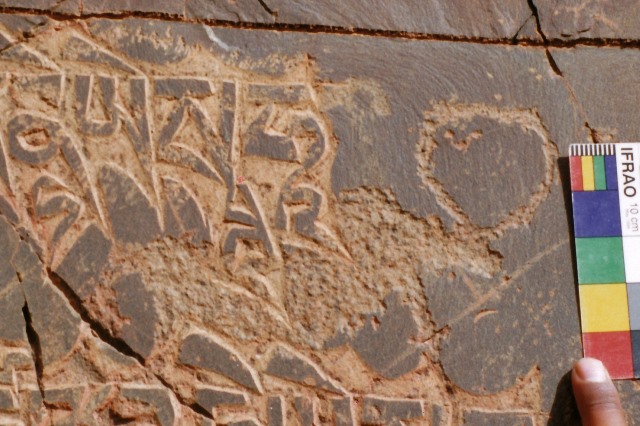
Fig. 161. Lone wild yak with Buddhist mantras superimposed
Prominent motifs: linear tail; circular horns; S-shaped back; square snout; rounded belly; two unflexed legs
Body: silhouetted
Technique: deeply engraved
Region: Far Western Tibet
Estimated Age: Iron Age or Protohistoric period
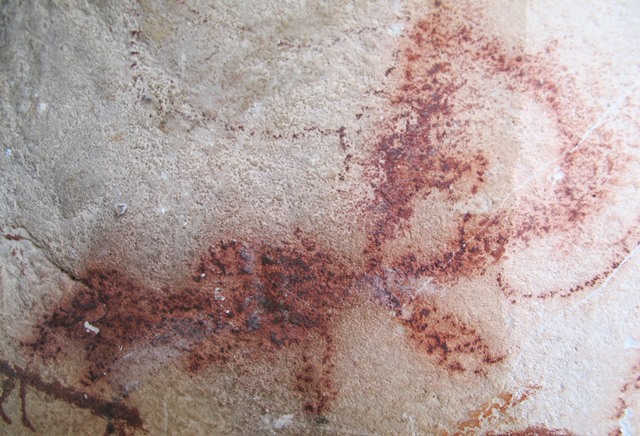
Fig. 162. Lone wild yak
Prominent motifs: linear tail; thick, inward curving horns; S-shaped back; elongated snout; rounded belly; two unflexed legs
Body: silhouetted
Technique: painted, red ochre
Region: Eastern Changthang
Estimated Age: Protohistoric period
Enduring Tibetan Legacy: A review of an article concerning the genetic make-up of ancient Mustang
This review notes major findings of a recently published article on genetic affinities of the prehistoric population of Mustang. See Choongwon Jeong / Andrew T. Ozga / David B. Witonsky / Helena Malmström / Hanna Edlund / Courtney A. Hofman / Richard W. Hagan / Mattias Jakobsson / Cecil M. Lewis / Mark S. Aldenderfer / Anna Di Rienzo / Christina Warinner. 2016: “Long-term genetic stability and a high-altitude East Asian origin for the peoples of the high valleys of the Himalayan arc”, in PNAS (Proceedings of the National Academy of Sciences of the United States of America), vol. 113 (no. 27), pp. 7485–7490. http://www.pnas.org/content/113/27/7485.full
Major findings
The Jeong et al. study presents findings derived from the sequencing of the genome of eight individuals from the Mustang region of Nepal dating to three different periods, circa 1200 BCE to 700 CE. Despite significant cultural changes in the material record (consisting mostly of mortuary objects and practices), the authors ascertain that the genetic make-up of the population in Mustang has remained stable for over 3000 years. The complete genomes, uniparental haplotypes and high-altitude adaptive alleles of this population indicate that it is probably of high-altitude East Asian (Tibetan) origin. Mustang, one of the major transverse valleys in the Himalaya, has long been a trade channel linking Tibet with the Indian Subcontinent, and this study suggests that it was likewise a conduit for genetic transfer in prehistory. The authors without further analysis or remark extrapolate these findings, purporting that they are relevant to other Himalayan populations as well.
Endogenous DNA was extracted from dental samples obtained from burials belonging to three different cultural phases in Mustang: Chokhopani (1200–450 BCE), Mebrak (450 BCE to 100 CE) and Samdzong (200–700 CE). The genome sequencing of this DNA material was compared to genetic data from a variety of contemporary Asian populations and determined to most closely match the genomes of Tibetans and Sherpas and less so other Tibeto-Burman speaking groups (Naxi, Yi, and Tujia). The findings indicate that there were severe impediments to gene flows from the south, while Tibetan areas to the north provided the genetic and/or cultural adaptations required for the inhabitants of Mustang to thrive in high altitude conditions. Jeong et al. is one of a growing number of genetic studies demonstrating that there was a formidable barrier to northward transmission of genes across the Himalayan divide.
My comments
As acknowledged by Jeong et al., the sequencing of the genome of a wider cross-section of the ancient population of Mustang is necessary to reconstruct the adaptive evolution of beneficial genes such as those that confer resistance to hypoxia. Only the genomes of five of the eight individuals tested were deeply sequenced, so caution must be exercised in applying the conclusions reached to a broader swathe of the high Himalayan region. It remains to be shown how applicable the Mustang results are to other Transhimalayan tracts, as they may have distinctive settlement histories. Recent archaeological discoveries in Ladakh are a case in point. They highlight a significant cultural watershed between the upper and lower regions, possibly pointing to significant genomic variability in contemporary Tibetan-speaking populations. Clearly, more genome profiling and analysis of peoples across the Himalayan arc is needed to establish the antiquity of Tibetan-speaking populations in current locations, pinpoint prehistoric gene flows from the Tibetan Plateau, and identify possible later migration events.
While more genomic data is required, the findings of the Jeong et al. appear to be an extremely important signpost for other western regions (Stod) of the Tibetan Plateau and Himalayan rim-land. They encourage us to see the archaeological legacy of the last 3200 years in Upper Tibet as indicative of endogenous cultural development rather than the result of wholesale demic replacement. Although the genomic evidence is still inconclusive, the rock art record of Upper Tibet with its idiosyncratic content and esthetic and technical features is in line with the unfolding of internal cultural processes. For example, the canon of wild yak portrayal and wild yak hunting scenes, dating from the Late Bronze Age to the historic epoch, may be read as the product of a local population retaining integral demographic traits over the long sweep of time. Other wild ungulate and swastika rock art reinforce a picture of longstanding cultural and ethnic continuity. Furthermore, the thorough indigenization of subjects of obvious foreign origins in the rock art of Upper Tibet (eg., mascoids, chariots and Eurasian animal style rock art) and their restricted distribution (save for chariots) in the northwestern corner of Upper Tibet, suggests that the broader region was not saturated with extraneous gene flows representative of large-scale migration. Finally, the Tibetan historical tradition also speaks of long-settled groups in Upper Tibet such as the Dmu and Smra. In light of the Jeong et al. study, the rock art and historical records of Upper Tibet are best seen as indicative of a population with a genomic make-up corresponding to a Tibetan ethnos. This does not diminish the prospect of genetic inflows from surrounding regions and beyond but these were probably of relatively minor amplitude.
Next Month: More wild yak rock art and other fascinating features!